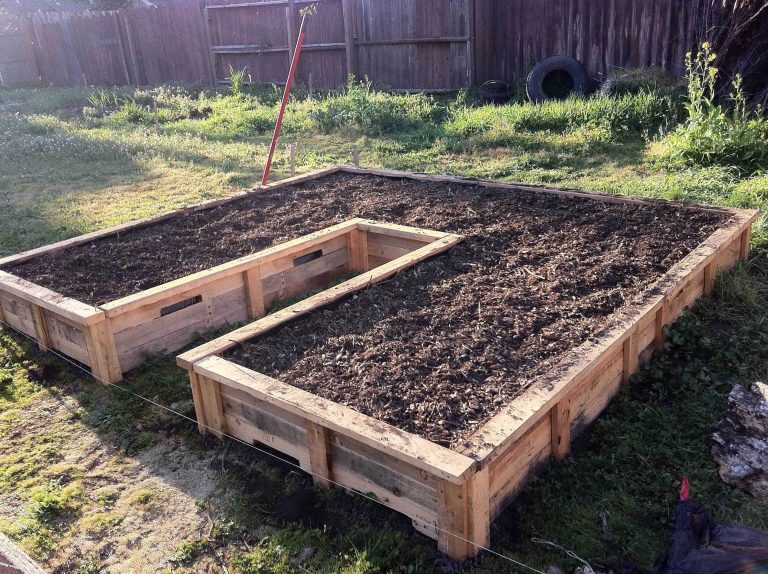
How To Make A Raised Row Garden: Easy DIY Guide
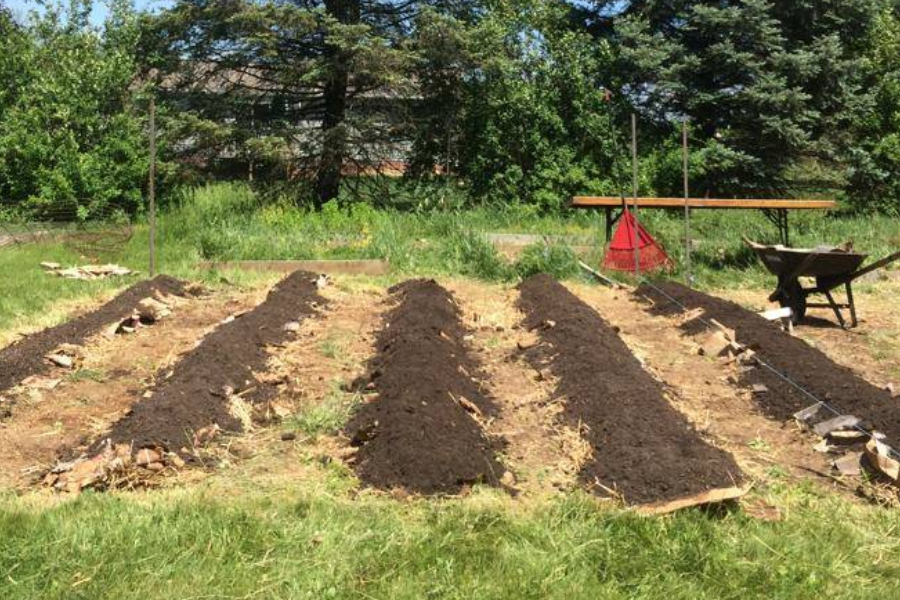
A raised row garden gives you the main benefits of a raised bed without the cost, weight, or permanent frame. You shape long, slightly raised planting rows right in the ground. The rows warm faster, drain better, and stay loose under your plants, while the paths between them protect the soil from foot traffic.
I have used raised rows in sandy soil in North Carolina, heavy clay in Ohio, and short-season gardens in USDA Zone 5. The method worked in all three places, but the best row height, mulch, and watering plan changed with the soil and climate. A good raised row garden is not hard to build, but small choices matter.

Quick answer: how to make a raised row garden
To make a raised row garden, mark beds 24 to 36 inches wide with 18- to 24-inch paths between them. Loosen the soil 8 to 12 inches deep, mix in 2 to 4 inches of compost, then rake soil from the paths onto each growing row. Shape the rows 6 to 12 inches high, mulch the paths, and plant crops based on their sun, spacing, and watering needs.

What a raised row garden is and how it works
A raised row garden uses soil from the garden site to form long, low ridges. You do not need wood, stone, metal, or plastic walls. The rows may look like small garden beds, but they remain open to the ground below.
The raised soil gives plant roots a deeper, looser zone. Water can move away from the root area more easily than it can in a flat, compacted bed. At the same time, the raised surface warms sooner in spring, which helps crops such as lettuce, carrots, onions, and beans get started.
Raised rows versus raised beds
The main difference is support. A raised bed holds soil inside a frame, while a raised row depends on shaped soil and stable paths.
Raised rows cost less and allow roots to grow beyond the row into native soil. They also suit large crops, long garden plots, and gardeners who want to use a rototiller between rows. Raised beds offer cleaner edges and better control over poor or contaminated soil, but they need more materials and upkeep.
Who should use this method
Raised rows work well for gardeners who have:
- Heavy clay or compacted ground
- Poor drainage
- A large space for vegetables
- A limited budget
- A need to warm spring soil
- Soil that can support a simple mound
- Enough space for permanent walking paths
They may not suit a tiny patio garden, a sloped site, or land with lead or other soil contamination. In those cases, containers or framed raised beds offer more control.
Choose the best place before you build
The best garden site gets at least six hours of direct sun each day. Eight to ten hours gives tomatoes, peppers, cucumbers, squash, beans, and melons the light they need for strong growth.
Watch the site after a heavy rain. Avoid places where water sits for more than a day. A raised row can improve drainage, but it cannot fix a low spot that receives runoff from a roof, driveway, or higher slope.
Check sun, wind, and water access
Place rows where you can reach them with a hose. A garden that sits 150 feet from the water source often gets neglected during hot weather.
In the Northern Hemisphere, north-south rows usually give plants more even light. East-west rows can work well too, especially if the garden faces strong summer winds or if the layout fits the land better.
Avoid planting tall crops on the south side of short crops. Tomatoes, corn, trellised cucumbers, and sunflowers can shade lettuce, carrots, and basil.

Test the soil first
A basic soil test tells you the soil pH, phosphorus, potassium, calcium, and organic matter. Most vegetables grow well at a pH between 6.0 and 7.0. Blueberries need a much lower pH, so they usually belong in a separate bed.
Do not add lime, sulfur, or large amounts of fertilizer by guesswork. I once added lime to a new row garden without testing first. The crops grew, but the beans developed pale leaves the next season because the soil pH had climbed too high.

| Site factor | Good target | Why it matters |
|---|---|---|
| Sunlight | 6–10 hours daily | Supports strong growth and fruit |
| Soil depth | 12–18 inches | Gives roots room to spread |
| Path width | 18–24 inches | Allows easy walking and tools |
| Soil pH | 6.0–7.0 for most vegetables | Supports nutrient uptake |
| Water access | Hose within easy reach | Makes regular watering easier |
These targets fit most home vegetable gardens. Adjust them for crop type, local rainfall, slope, and soil texture.
Gather tools and materials
You need simple tools for a raised row garden. A garden fork often works better than a tiller because it loosens soil without chopping up worms and soil structure.
Wear sturdy shoes, gloves, eye protection when using powered tools, and long pants when clearing rough ground. If you use a tiller, keep children and pets away and follow the machine manual.
| Tool or material | Suggested choice | Main use |
|---|---|---|
| Measuring tape | 25-foot tape | Marks row length and width |
| Stakes and string | Untreated stakes | Keeps rows straight |
| Garden fork | 4-tine digging fork | Loosens compact soil |
| Rake | Bow or garden rake | Shapes rows and smooths soil |
| Compost | Mature plant-based compost | Adds organic matter |
| Mulch | Straw, leaves, or wood chips | Covers paths and slows weeds |
| Water source | Hose with gentle wand | Waters new rows |
A broadfork can save time in a large garden, but it is not required. A shovel can turn soil, but repeated deep digging can bring weed seeds to the surface and disturb soil layers.
Pick the right amendments
Use finished compost that smells earthy and contains no fresh manure. Fresh manure can burn roots, add too much salt, and introduce weed seeds or pathogens.
For most raised rows, compost is the main amendment. Gardeners with heavy clay may also use leaf mold or aged pine bark fines. Do not add large amounts of sand to clay soil. The mix can become hard, much like concrete.
Decide how you will mulch
Straw, shredded leaves, grass clippings, and wood chips can cover the paths. Use dry grass clippings from a lawn that has not received herbicide. Never use thick layers of fresh, wet clippings around seedlings.
I prefer straw or shredded leaves in vegetable gardens. Wood chips last longer in paths, but they can tie up a small amount of nitrogen if mixed into the planting soil. Keep wood chips on the surface.

Plan the row size and layout
A row garden works best when every plant is easy to reach without stepping on the growing soil. Make each row narrow enough to reach the center from either side.
For most home gardens, a row width of 24 to 36 inches works well. A 30-inch row gives good growing space while still allowing you to reach about 15 inches from each side.

| Garden feature | Small-space option | Easy-access option |
|---|---|---|
| Row width | 24 inches | 30–36 inches |
| Path width | 18 inches | 24–30 inches |
| Row height | 6–8 inches | 8–12 inches |
| Row length | 6–12 feet | 12–30 feet |
| Trellis placement | At row edge | Along north side |
Narrow rows help new gardeners reach the soil. Wider rows produce more food per foot, but they become hard to weed if you cannot reach the center.

Use blocks instead of single crop lines
You can plant in blocks inside each row. For example, plant carrots in a 12-inch-wide block rather than one thin line. Plant lettuce on 8-inch centers in a block, or grow onions in several short lines.
Block planting uses space well and can reduce bare soil. Leave enough room for air movement around tomatoes, cucumbers, squash, and other plants that spread.

Add paths before shaping the rows
Mark the paths first. This step prevents a common mistake: building attractive rows that are too close together to weed or harvest.
Keep permanent paths covered with mulch. If you walk on bare soil after rain, you compress it and carry mud into the growing rows. A 2- to 3-inch layer of straw, leaves, or wood chips works well.

Build a raised row garden step by step
The best time to build a raised row garden is when the soil is moist but not wet. If soil sticks to your boots or shovel in thick clumps, wait a few days. Working wet soil can create long-lasting compaction.
In cold climates, build rows in late fall or early spring. In USDA Zones 8 through 10, you can build during much of the winter, but avoid working soil after heavy rain.
1. Clear the site
Remove large weeds, grass, rocks, plastic, and woody roots. If the site has sod, cut it into strips with a sharp spade and lift it away.
Do not bury perennial weeds such as bindweed, quackgrass, or bermudagrass under a thin layer of soil. They can grow back through the rows. Compost the sod only if you can maintain a hot compost pile that kills roots and seeds.
2. Mark the rows and paths
Place stakes at each end of every row. Run string between the stakes. Measure the width of each growing row and each path.
Keep the rows straight if you plan to use a wheel hoe or small tiller. Slightly curved rows can look natural, but straight paths make watering, mulching, and crop rotation easier.
3. Loosen the growing soil
Use a garden fork to loosen the top 8 to 12 inches of soil. Push the fork in, rock it back, and lift the soil slightly. Do not flip every shovelful.
If the ground has a hardpan, loosen deeper in narrow passes. Hardpan is a dense soil layer that slows roots and water. In some gardens, a broadfork reaches 12 to 16 inches and opens the soil with less mixing.
4. Add compost
Spread 2 to 4 inches of mature compost over each growing row. For a new garden with poor soil, use closer to 4 inches. For an established garden with healthy soil, 1 to 2 inches each year may be enough.
Mix the compost into the top 4 to 6 inches. Do not bury it 12 inches deep. Soil life will move organic matter down over time, and deep compost layers can hold too much water.
5. Pull soil into the rows
Use soil from the paths to build the rows. Pull a few inches from each side toward the center. Rake the top flat, then shape the sides with the back of the rake.
Aim for a 6- to 12-inch rise above the path. A 6-inch row works in most gardens. Use a taller row in wet clay or a cool spring climate, but remember that taller rows dry faster.
6. Shape the row top
Make the top flat or gently rounded. A flat top gives you more planting space. A rounded top sheds water and can resist erosion, but it provides less usable surface.
Do not make the sides too steep. A gentle slope holds together better after rain. If the row collapses, add compost and leaf mold, then rebuild it with a wider base.
7. Cover the paths
Spread 2 to 4 inches of mulch in the paths. Keep mulch off the stems of plants and away from seedlings until they have a few true leaves.
Mulched paths reduce weeds, protect soil from rain, and make the garden easier to walk through. They also create habitat for ground beetles, spiders, and other helpful insects.
8. Water and let the soil settle
Water the finished rows slowly. Watch for runoff. If water races down the side, the row may be too steep or too dry.
Let the soil settle for a few days before planting tiny seeds. You can plant transplants at once, but firm the soil around their roots and water them well.
Fill the rows with the right soil mix
A raised row is not the same as a box filled with purchased soil. Most of the soil comes from your site, so its texture still matters.
The goal is a crumbly soil that holds moisture but drains excess water. You should be able to squeeze a handful into a loose ball that breaks apart with a light tap.
| Soil condition | Add first | Avoid |
|---|---|---|
| Heavy clay | Compost and leaf mold | Large amounts of sand |
| Very sandy soil | Compost and aged organic matter | Light, dry mulch only |
| Rocky soil | Screened compost and topsoil | Deep tilling over buried rocks |
| Low organic matter | Compost over several seasons | Fresh manure |
| Poor drainage | Raised rows and surface channels | Sealing the soil with plastic |
Organic matter breaks down over time. Add a thin layer of compost each season instead of making one huge amendment dump.
Understand compost and fertilizer
Compost improves structure, but it may not supply all the nitrogen that heavy-feeding crops need. Tomatoes, corn, squash, and cabbage often need more nutrients than lettuce or herbs.
Start with a soil test. If fertilizer is needed, choose a product that matches the test. A balanced organic fertilizer such as 5-5-5 can work for general use, but avoid applying more than the label rate.
Do not place granular fertilizer against seeds or roots. Mix it into the soil or apply it beside growing plants, then water it in.
Check the soil after one season
After four to six weeks, look for even growth, good color, and steady moisture. Pale leaves, slow growth, or a crusted soil surface can signal a problem.
Take another soil sample after two or three seasons if the garden receives heavy compost or fertilizer. Excess phosphorus can build up, and high salts can harm germinating seeds.
Plant crops that match raised rows
Raised rows suit most vegetables, herbs, and flowers. Choose crops based on root depth, spacing, sunlight, and local frost dates.
In USDA Zones 3 through 5, cool crops such as spinach, peas, kale, radishes, and lettuce can go in early. In Zones 8 through 10, they often grow best from fall through spring, while summer heat can make them bolt.
Shallow-rooted crops
Good shallow-rooted crops include:
- Lettuce
- Spinach
- Radishes
- Arugula
- Green onions
- Cilantro
- Bush beans
These crops need only moderate soil depth. Keep the top few inches evenly moist because their roots dry out fast in a raised row.
Deep-rooted crops
Tomatoes, parsnips, carrots, beets, peppers, and winter squash benefit from loose soil below the row. Remove stones and hard clods before sowing carrots and parsnips.
Use compact varieties when space is limited. ‘Patio Choice Yellow’ tomato suits small gardens, while ‘Roma’ works well where you want paste tomatoes. Determinate tomatoes need less trellis space than indeterminate types.
Vining and spreading crops
Cucumbers, pole beans, peas, melons, and small squash need a plan. Put a trellis along the north side of the row so it does not shade lower crops.
Train cucumbers and pole beans early. A trellis also keeps leaves off wet soil and improves air movement, which can reduce powdery mildew and foliar disease.
Water and maintain the garden
Raised rows often need more frequent watering than flat ground because the soil surface has more exposure. Young plants and seeds need steady moisture, but mature plants need deep watering.
Water at the soil line in the morning. A soaker hose or drip line works better than a sprinkler for tomatoes, peppers, cucumbers, and squash because it keeps leaves dry.
| Crop group | Check soil | Typical watering need |
|---|---|---|
| Seeds and seedlings | Daily in warm weather | Light, frequent moisture |
| Lettuce and herbs | Every 1–2 days | Even moisture |
| Tomatoes and peppers | 2–3 times weekly | Deep watering |
| Beans and cucumbers | 2–4 times weekly | More during flowering |
| Root crops | 2–3 times weekly | Steady moisture for good roots |
These are starting points, not fixed rules. Sandy rows may need water each day in a heat wave, while clay rows may need less. Push a finger 2 inches into the soil before watering.
Mulch the row surface
Once plants are established, add 1 to 3 inches of straw, shredded leaves, or untreated grass clippings around them. Leave a small gap around stems.
Mulch slows evaporation and reduces soil splash. It also helps keep tomato leaves cleaner, which can lower the spread of early blight spores.
Weed before weeds flower
Pull weeds while they are small. A stirrup hoe or collinear hoe can cut weeds between rows without turning the soil deeply.
Do not let purslane, lamb’s quarters, pigweed, or crabgrass mature and drop seeds. One neglected season can create years of extra work.
Follow a simple seasonal plan
Raised rows change with the seasons. In spring, they warm early but may dry fast. In summer, mulch and deep watering matter most. In fall, cover crops and compost protect the soil.
The best planting date depends on your USDA hardiness zone, local frost date, and current soil temperature. Use a soil thermometer for crops such as beans, corn, cucumbers, and melons.
| Season | Main tasks | Suitable crops or cover |
|---|---|---|
| Early spring | Repair rows, add compost, plant cool crops | Peas, spinach, lettuce |
| Late spring | Plant warm crops after frost | Tomatoes, beans, peppers |
| Summer | Mulch, water deeply, support vines | Cucumbers, basil, squash |
| Fall | Harvest, remove disease, add cover | Kale, garlic, rye |
| Winter | Protect soil and plan rotation | Leaves, straw, cover crops |
Do not leave bare soil exposed through a wet winter if erosion is a problem. A cover crop such as cereal rye can protect the surface, but cut it before it forms mature seed.
Use crop rotation
Move plant families each season when space allows. Do not grow tomatoes, peppers, eggplant, and potatoes in the same row year after year. These crops belong to the nightshade family and share several diseases.
Rotate with legumes such as beans and peas, leafy crops, and root crops. Rotation helps break pest and disease cycles, though it cannot replace sanitation or resistant varieties.
Protect rows in winter
Add compost after fall cleanup, then cover it with leaves or straw. Do not till wet soil. Let winter moisture and soil organisms work the material into the row.
Remove diseased tomato vines and squash leaves from the garden. Do not add them to a cool backyard compost pile, since pathogens may survive.
Solve common raised row problems
Most problems come from poor drainage, weak row shape, uneven watering, or soil that lacks organic matter. Find the cause before adding more fertilizer.
Walk the garden once or twice each week. Look under leaves, check the soil with your finger, and inspect row edges after rain. Early action costs less than trying to save stressed plants later.
| Symptom | Likely cause | Fix |
|---|---|---|
| Row collapses after rain | Sides too steep or soil too loose | Widen the base and add organic matter |
| Seeds fail to sprout | Dry surface or crusted soil | Water gently and cover lightly |
| Leaves turn pale | Low nitrogen, wet roots, or pH issue | Test soil before feeding |
| Plants wilt each afternoon | Dry roots or damaged roots | Check soil depth and water slowly |
| Standing water remains | Low site or compacted subsoil | Improve drainage or relocate rows |
| Chewed seedlings | Slugs, cutworms, or insects | Use barriers and inspect at dusk |
A symptom can have more than one cause. For example, yellow leaves may result from nitrogen shortage, root damage, waterlogged soil, or a high pH that blocks iron.
Why does my raised row dry out so fast?
Raised rows dry quickly when they are tall, narrow, sandy, or exposed to wind. Dark mulch can warm the soil but may also increase water loss in a hot climate.
Lower the row height, add compost, use 2 to 3 inches of mulch, and install drip irrigation. Water deeply enough to wet the root zone, not just the top half-inch.
Why does the row wash away?
Bare soil, steep sides, intense rain, and loose new compost can cause erosion. A rounded row with a wide base holds better than a sharp ridge.
Plant a living cover on unused rows. You can also place straw across the slope, use small cross channels, or direct roof runoff away from the garden.
What if weeds grow through the paths?
First identify the weed. Annual weeds can be hoed or pulled. Perennial weeds may need repeated removal or a light-blocking cover.
For a new site, lay cardboard under path mulch only after removing aggressive perennial roots. Cardboard can slow weeds, but it will not stop established bermudagrass or bindweed forever.
Pros and cons of raised row gardening
Raised rows offer a low-cost way to improve soil structure and drainage. They also keep the garden connected to native soil, which helps earthworms and beneficial microbes move through the root zone.
They are not perfect for every site. The soil can slump, paths need upkeep, and contaminated or very rocky ground may still require framed beds or containers.
| Pros | Cons |
|---|---|
| Low construction cost | Rows can erode or collapse |
| No lumber or frame needed | Paths take up garden space |
| Warms early in spring | Raised soil can dry quickly |
| Easy to expand | Shape needs seasonal repair |
| Works with native soil | Poor native soil remains a concern |
| Good for large gardens | Not ideal on steep slopes |
Choose raised rows when you want more soil height without building permanent structures. Choose framed beds when you need strict soil control, clean edges, or strong accessibility features.
My experience with raised row gardens
The best results I have had came from 30-inch rows, 24-inch paths, and 8-inch row height. That layout let me reach the center without stepping into the soil, and it left enough room for a wheel hoe.
My first attempt used 12-inch-high rows in sandy soil. The rows looked impressive, but they dried too fast during July. After I lowered them to about 8 inches and added leaf compost plus straw mulch, the plants stayed healthier with less watering.
I also learned not to overwork clay. A tiller made the top look fine, but the next rain sealed the surface. Forking the soil when it was barely moist gave me better structure over two seasons.
Improve the garden with companion planting
Companion planting works best when it improves space use, attracts pollinators, or protects soil. It does not make pests disappear by itself.
Plant basil near tomatoes for efficient use of space, but do not expect basil to stop every tomato hornworm. Add flowers such as calendula, alyssum, dill, and zinnias to bring bees, hoverflies, and other pollinators.
Useful plant combinations
Try combinations such as:
- Carrots with radishes
- Tomatoes with basil and calendula
- Cucumbers with dill
- Beans with lettuce in early summer
- Kale with alyssum
- Peppers with low-growing herbs
Give each crop enough room for air flow. Crowding can raise humidity and increase powdery mildew, downy mildew, and bacterial leaf spot.
Keep raised rows safe and accessible
Use clean compost and soil from a trusted source. If you garden near an old painted building, treated lumber, industrial site, or busy road, test for lead and other contaminants before growing food.
Keep paths firm and clear. A 24-inch path works for walking, while 30 to 36 inches makes it easier to use a garden cart or mobility aid.
Do not use pressure-treated wood, old railroad ties, or unknown construction debris as soil amendments. Raised rows need no frame, so there is little reason to add questionable materials.
⚠️ Warning: Stop working soil if it becomes muddy and sticky. Foot traffic and tools can create compaction that lasts for years, especially in clay.
Save money without cutting corners
The main cost is often compost. Current local pricing varies, but bulk compost usually costs less per cubic yard than bagged material. A pickup load can supply several rows for much less than filling framed beds.
Use free leaves from clean yards, saved cardboard for paths, and homemade compost when available. Avoid free loads that contain herbicide-treated grass, construction waste, or invasive weed roots.
A small garden fork, rake, hoe, and hose are enough to start. You do not need a tiller, broadfork, rototiller attachment, or powered cultivator unless the garden is large.
Estimate compost needs
To estimate compost, multiply row length by row width by compost depth. Keep all measurements in feet.
For example, a 20-foot row that is 2.5 feet wide and receives 0.25 feet of compost needs 12.5 cubic feet. Divide by 27 to convert cubic feet to cubic yards, giving about 0.46 cubic yards.
Buy a little extra because compost settles. You can use the remainder on paths or save it for later top-dressing.
Mistakes that make raised rows harder
Avoid building rows too close together. Tight paths make harvesting awkward and encourage you to step into the soil.
Do not create a sharp, tall ridge. It dries quickly and erodes after heavy rain. A broad mound with a flat top gives you more stable planting space.
Do not mix fresh manure into the row before planting. Use aged compost instead, and follow food safety guidance for manure applications.
Common beginner mistakes
- Building on a site with less than six hours of sun
- Skipping the soil test
- Making paths too narrow
- Working wet soil
- Adding too much fertilizer
- Planting before the last frost
- Leaving soil bare
- Watering only the surface
- Growing the same plant family in one row each year
🌱 Beginner Note: Start with two rows instead of building the whole garden at once. You will learn how fast your soil dries, how much compost you need, and which path width feels comfortable.
Questions gardeners often ask
Raised row gardening seems simple, but new gardeners often wonder about height, soil, tools, crops, and long-term care. These answers cover the most common concerns.
Q: How high should a raised garden row be?
A: Make most rows 6 to 8 inches high. Use 8 to 12 inches in heavy clay or wet ground. Taller rows drain well but dry faster and may need more compost and water.
Q: Do raised rows need a frame?
A: No. Raised rows use shaped soil instead of walls. Add a frame only if erosion, accessibility, animals, or a steep slope makes an open row hard to maintain.
Q: What is the best soil for raised rows?
A: A loamy soil with compost works well. Aim for soil that holds together when squeezed but breaks apart easily. Most vegetables prefer a pH near 6.0 to 7.0.
Q: Can I build raised rows over grass?
A: Remove sod and perennial weeds first. You can cover annual grass with cardboard and compost, but aggressive roots such as bermudagrass may grow back.
Q: How wide should raised garden rows be?
A: Make rows 24 to 36 inches wide. Use 24 inches if you have limited reach. Use 30 to 36 inches if you want more planting space and can reach the center.
Q: How wide should paths be between rows?
A: Use at least 18 inches for walking. Choose 24 to 30 inches for a wheel hoe, cart, or easier access. Mulch paths to reduce weeds and mud.
Q: Can I use raised rows in clay soil?
A: Yes. Loosen the soil when it is moist, add compost, and build broad rows. Avoid adding sand and avoid tilling when the clay is wet.
Q: How often should I water raised rows?
A: Check the top 2 inches of soil. Water when that layer feels dry, then soak the root zone. Young seedlings may need daily checks, while mature crops often need deep watering two or three times per week.
Q: Why are my raised rows drying out?
A: Tall rows, sandy soil, wind, heat, and missing mulch can cause fast drying. Lower the rows, add compost, cover the surface, and use drip irrigation or a soaker hose.
Q: What should I plant in the first raised row garden?
A: Start with forgiving crops such as beans, lettuce, radishes, kale, basil, onions, and zucchini. Add tomatoes and peppers after you understand the site’s watering and frost pattern.
Q: Can I grow potatoes in raised rows?
A: Yes. Plant seed potatoes in loose soil and add soil or straw as stems grow. Keep the tubers covered so sunlight does not turn them green.
Q: How long do raised rows last?
A: The row shape can last for many seasons, but rain, traffic, freeze-thaw cycles, and organic matter breakdown slowly lower it. Top-dress with compost and reshape the row once or twice each year.
Q: Should I till raised rows every spring?
A: Usually not. If the soil is loose, add compost to the surface and use a fork only where needed. Repeated deep tilling can damage soil structure and bring weed seeds to the surface.
Q: Are raised rows better than raised beds?
A: Raised rows cost less and work well for large gardens with healthy native soil. Raised beds offer better control over contaminated soil, drainage, shape, and accessibility. The right choice depends on your site and budget.
Q: Should I add fertilizer when I build the rows?
A: Test the soil first. Compost may supply enough nutrients for light-feeding crops. Add fertilizer only when a soil test or crop need supports it, and follow the product label.
Final thoughts
A raised row garden is a practical middle ground between flat-ground planting and framed raised beds. It improves drainage, warms soil, reduces compaction, and costs little to build. The best setup is usually simple: sunny rows, wide paths, mature compost, gentle slopes, and mulch.
Start small, observe the garden for one full season, and adjust the row height or path width based on what you see. Good soil improves over time, and a well-planned raised row garden can keep producing vegetables, herbs, flowers, and pollinator plants for many years.
Meta description: Learn how to make a raised row garden with simple tools, compost, soil tips, row sizes, planting plans, watering advice, and easy fixes for common problems.