How To Build A 4×8 Raised Garden Bed: Easy DIY Guide
A 4×8 raised garden bed gives you 32 square feet of growing space in a neat, easy-to-reach shape. It is large enough for tomatoes, peppers, lettuce, carrots, herbs, and flowers, yet small enough for a beginner to manage. I have built this size in heavy clay, sandy soil, and wet ground, and the same lesson always holds: good lumber, strong corners, and the right soil mix matter more than fancy tools.
You can build a basic 4×8 raised bed in one afternoon. Most gardeners need four boards, exterior screws, a drill, a saw, a level, and about 10 to 14 cubic feet of soil. With careful planning, the bed can last five to ten years or more, depending on the wood, climate, moisture, and care.

Quick answer: how to build a 4×8 raised garden bed
The best way to build a 4×8 raised garden bed is to make a level rectangle from four 8-foot boards, reinforce each corner with sturdy posts or brackets, and fill it with quality soil and compost. Use untreated cedar or another safe outdoor wood. A 12-inch-high bed needs about 1.5 cubic yards of soil, while a 6-inch bed needs about 0.75 cubic yards.

Choose the right size, height, and location
A 4×8 bed works best in a spot with at least six to eight hours of direct sun. Place it near a water source, but do not put it where roof runoff floods the bed. A level site makes the build easier and helps water spread evenly.
The bed can sit on grass, bare soil, gravel, or a firm patio. Bare soil gives roots the most room. A bed on concrete needs a deeper soil mix and drainage holes because plant roots cannot grow below the frame.
How tall should a raised bed be?
A 6-inch bed works for lettuce, spinach, herbs, and shallow-rooted flowers. A 12-inch bed is more useful for mixed vegetables and gives you enough depth for carrots, onions, bush beans, and many pepper varieties.
A 24-inch bed is easier to reach, but it costs more to fill. It also needs stronger sides because wet soil creates a great deal of outward pressure. For most home gardens, 11 to 12 inches is the best balance.
How much sun does a 4×8 bed need?
Most vegetables need at least six hours of sun. Fruiting crops, such as tomatoes, cucumbers, squash, and peppers, often perform better with eight hours.
In USDA Zones 3 through 5, place the bed where it gets strong southern exposure. In hot parts of Zones 8 through 10, afternoon shade can help lettuce and cilantro stay productive longer.

Quick planning table
| Bed feature | Recommended choice | Why it matters |
|---|---|---|
| Length and width | 4 feet by 8 feet | Easy to reach from both sides |
| Standard height | 11 to 12 inches | Good depth for most vegetables |
| Sun exposure | 6 to 8 hours | Supports strong growth and fruit |
| Access space | 2 to 3 feet around bed | Leaves room to weed and harvest |
| Soil volume | About 1.5 cubic yards at 12 inches | prevents underfilling |
A 4-foot width lets most people reach the center without stepping into the soil. Keep at least 2 feet between beds, and use 3 feet if you plan to push a wheelbarrow through the garden.
Gather the tools and materials
A strong raised bed starts with straight boards and corrosion-resistant fasteners. Do not save money by using thin fence boards for a tall bed. They often bow after one wet season.
For an 8-inch to 12-inch bed, 2×10 or 2×12 boards are common choices. Cedar costs more than pine, but it usually handles outdoor moisture better. Pressure-treated lumber labeled for modern residential use is also widely used, but some gardeners prefer cedar for vegetable beds.

Materials list
| Material | Amount for one 4×8 bed | Notes |
|---|---|---|
| 2×10 or 2×12 boards, 8 feet long | 4 | Two long sides and two end sides |
| 4×4 corner posts | 4 pieces, 12 to 18 inches | Cut or buy as supports |
| Exterior structural screws | 24 to 32 | Use 3-inch or 3 1/2-inch screws |
| Compost | 4 to 6 cubic feet | Adds organic matter |
| Garden soil or topsoil | 8 to 10 cubic feet | Forms the main soil base |
| Fine mulch | 1 to 2 cubic feet | Reduces weeds and moisture loss |
| Hardware cloth | Optional | Useful over active rodent tunnels |
You may also need landscape staples, cardboard, a wheelbarrow, and a soil rake. Avoid landscape fabric beneath a bed placed on soil. It can block earthworms and restrict root growth. Cardboard works better for smothering grass during the first season.
Tools you will need
| Tool | Use |
|---|---|
| Tape measure | Check board length and bed size |
| Circular saw | Cut corner posts or boards |
| Drill and driver bit | Drill pilot holes and drive screws |
| Level | Check the frame from side to side |
| Carpenter’s square | Keep corners at 90 degrees |
| Rubber mallet | Set boards and posts without crushing wood |
| Work gloves and safety glasses | Protect hands and eyes |
A basic cordless drill with a 20-volt battery has enough power for this job. I use a drill with a clutch, because it lowers the chance of stripping screw heads. A compact circular saw works well, but a handsaw can handle four short post cuts.

💡 Pro Tip: Buy one extra screw box and one extra board if your local store allows returns. A warped board can waste more time than the small cost of a spare.
Pick safe and durable lumber
Untreated cedar is a popular choice because it resists rot and is easy to cut. Redwood, cypress, black locust, and white oak can also last well, but price and local supply vary. Pine costs less, yet it may last only three to five years in wet climates unless you protect it.
Do not use old railroad ties, creosote-treated wood, painted boards, or wood with unknown chemical treatment. These materials may release unwanted compounds into the soil. Do not burn scraps from treated lumber, either.
Cedar, pine, composite, or metal?
| Bed material | Typical life | Main strength | Main drawback |
|---|---|---|---|
| Cedar | 7 to 15 years | Rot resistance and easy cutting | Higher cost |
| Untreated pine | 3 to 7 years | Low price | Rots faster |
| Composite boards | 10 to 20 years | Do not rot like wood | Can bow and cost more |
| Galvanized metal | 15 years or more | Long life and clean shape | Heats up in hot climates |
| Reclaimed hardwood | Varies | Can be strong and attractive | Safety and chemical history may be unclear |
A cedar bed is often worth the money for a long-term vegetable garden. Pine may suit renters or new gardeners who want a low-cost trial. Metal beds work well in rainy areas, but they need extra watering in hot, dry climates.
Should you line the inside of the bed?
You do not need to line a wooden raised bed in most cases. A plastic liner can trap water against the boards and speed rot. If the bed sits on a hard surface, use a food-safe liner only if it allows drainage and does not block the bottom.
For a bed on soil, leave the bottom open. Add cardboard over grass if needed, then cover it with soil. The cardboard will break down over time.

⚠️ Warning: Never use wood treated with creosote, old oil, or an unknown preservative around edible crops. When the wood history is unclear, choose new untreated cedar instead.
Build the 4×8 frame step by step
Building the frame is simple, but small errors can make the bed twist or pull apart. Measure twice, keep the corners square, and use pilot holes near board ends.
1. Measure and mark the site
Mark a rectangle that measures 8 feet long and 4 feet wide. Add the width of the boards if you want the inside growing space to measure exactly 4×8 feet.
For example, two 2-inch-thick end boards placed between the long boards create an outside width of about 4 feet if the long boards are 8 feet long. If you want the inside width to be 4 feet, cut the long boards to 8 feet and make the end boards 4 feet 3 1/2 inches long, depending on the true board size.
Most gardeners do not need exact interior dimensions. A frame with an outside size close to 4×8 feet works well.
2. Level the ground
Remove large stones, roots, and thick grass. Use a shovel to cut high spots and fill low spots. Check the site with a 4-foot level in several directions.
The frame does not need to be perfectly level for plants to grow. Still, a level bed looks better and prevents water from pooling at one end. A low corner can also cause soil to spill over the board.
3. Cut the corner posts
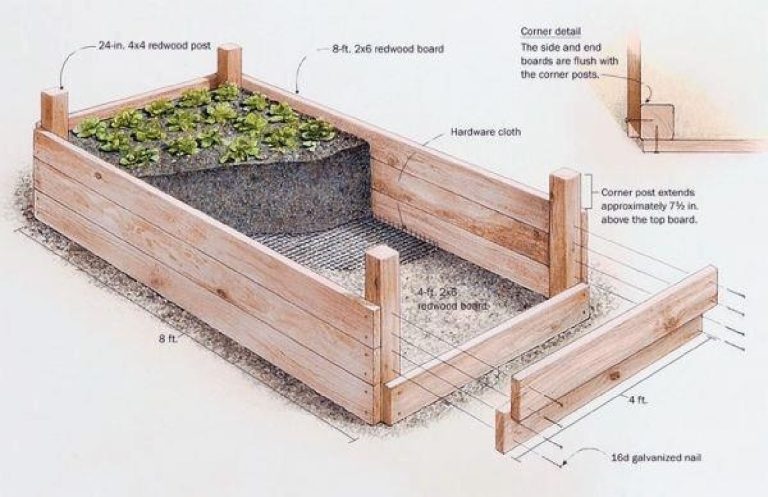
Cut four 4×4 posts into pieces about 12 to 18 inches long. For a 12-inch-high bed, 12-inch posts are enough when they sit inside the corners. Use 18-inch posts if you want to drive part of each post into the ground.
You can use 2×4 blocks instead of 4×4 posts, but larger corner posts resist twisting better. The corners take the most stress when the soil becomes wet.
4. Lay out the boards
Place the two 8-foot boards parallel to each other. Set the shorter end boards between them or against them based on your chosen layout.
Use a carpenter’s square at every corner. Measure both diagonals. If the two diagonal measurements match, the frame is square.
5. Drill pilot holes
Drill two pilot holes through each side board and into each corner post. Keep the holes about 1 inch from the top and bottom edges.
Pilot holes reduce splitting, especially in cedar and dry pine. Use a bit slightly smaller than the screw shaft. Do not place screws too close to the board ends.
6. Drive the screws
Drive 3-inch exterior structural screws through the boards and into the posts. Use two screws at each connection for a 12-inch-high bed.
A screw with a star or Torx head grips better than a Phillips screw. Do not use drywall screws. They snap easily and rust quickly outdoors.
7. Check the frame again
Set the level on each side. Check the corners for gaps. Measure the diagonals one more time before filling the bed.
If one corner lifts, press it down or remove a small amount of soil beneath it. A rubber mallet can help seat the boards without damaging them.
8. Add a center brace for extra strength
An 8-foot side can bow outward when the bed is full. Add a brace at the center of each long side if you use thin boards or build a bed taller than 12 inches.
You can install a 2×4 cross brace across the bed, but it may block a small part of the planting space. Another option is to connect the two long sides with galvanized threaded rod, washers, and nuts.

9. Protect the top edge
A rough board edge can catch clothing or cut a hand. Sand sharp corners with 80-grit sandpaper, then smooth them with 120-grit paper.
You can add a cedar cap to the top, but it is not required. A cap improves comfort when you sit on the bed and helps protect the board ends.
Fill the bed with healthy soil
The best raised bed soil holds moisture but drains excess water. Pure garden soil often becomes hard and heavy in a box. Pure compost can hold too much water, settle, and supply more nutrients than plants need.
A simple mix uses about 60 percent quality topsoil, 30 percent finished compost, and 10 percent aeration material such as pine bark fines. Some gardeners use coarse vermiculite, but it can be costly for a 4×8 bed.
Calculate the soil volume
Use this formula:
Length × width × depth = cubic feet
For a 4×8 bed that is 1 foot deep:
4 × 8 × 1 = 32 cubic feet
One cubic yard equals 27 cubic feet. So:
32 ÷ 27 = about 1.2 cubic yards
Because soil settles, plan for about 1.5 cubic yards. A 6-inch bed needs about 0.6 cubic yards, so buying 0.75 cubic yards gives you room for settling.

Soil mix options
| Bed depth | Soil needed before settling | Practical purchase amount |
|---|---|---|
| 6 inches | 16 cubic feet | 0.75 cubic yard |
| 12 inches | 32 cubic feet | 1.25 to 1.5 cubic yards |
| 18 inches | 48 cubic feet | 1.75 to 2 cubic yards |
| 24 inches | 64 cubic feet | 2.5 cubic yards |
Bulk soil usually costs less than bags, especially for a full 12-inch bed. Ask the supplier whether the mix contains screened topsoil, mature compost, wood fines, or sand. Fresh wood chips and unfinished compost can tie up nitrogen as they break down.
Test the soil before planting
A soil test gives you pH, phosphorus, potassium, and organic matter levels. Most vegetables prefer a pH between 6.0 and 7.0. Blueberries need a more acidic mix, so they do not belong in the same soil as tomatoes and beans.
Do not add lime just because someone recommends it online. Add lime only when a soil test shows low pH. Too much lime can lock up iron and other nutrients.
Fill in layers
Add soil in 3- to 4-inch layers. Water each layer lightly to help it settle. Do not pack it down with your feet, because compressed soil leaves little air around roots.
Leave 1 to 2 inches below the top edge. This keeps soil from washing out during heavy rain and leaves room for mulch.
🌱 Beginner Note: If the soil level drops by several inches after the first month, top it up with compost and garden soil. Settling is normal and does not mean the bed failed.
Plan plants for a 4×8 raised bed
A 4×8 bed gives you 32 square feet, but the usable space changes with plant size. A single indeterminate tomato can take 4 to 6 square feet when supported. Sixteen carrots may use less than 2 square feet.
Use a simple grid to plan the bed. Divide it into one-square-foot sections with string, thin boards, or a garden marker. This method helps prevent crowding without forcing you to follow exact rules.
A sample spring layout
| Bed area | Crops | Spacing or support |
|---|---|---|
| 4 square feet | Bush beans | 9 to 12 inches apart |
| 4 square feet | Carrots | Thin to 2 to 3 inches |
| 4 square feet | Leaf lettuce | 6 to 8 inches |
| 4 square feet | Basil and parsley | 8 to 12 inches |
| 8 square feet | Two tomatoes | Use cages or stakes |
| 4 square feet | Peppers | 12 to 18 inches |
| 4 square feet | Radishes | Succession sow every 2 weeks |
Put tall crops on the north side of the bed. This keeps tomatoes, trellised cucumbers, and pole beans from shading shorter plants. You can grow lettuce, cilantro, and spinach on the south side while spring weather stays cool.
Use succession planting
Succession planting means replacing a finished crop with a new one. After spring radishes, plant bush beans. After lettuce bolts in summer, plant kale or Swiss chard for fall.
In Zones 6 through 10, you may grow three or four crop cycles in one bed. In Zones 3 through 5, the season may allow two main cycles unless you use row cover or a cold frame.
Add flowers and herbs for pollinators
Nasturtiums, calendula, borage, dill, and sweet alyssum attract pollinators and beneficial insects. Let some dill flower if you want hoverflies and tiny wasps that help control aphids.
Mint spreads fast, so grow it in a pot rather than planting it in the bed. Fennel can also spread and may attract useful insects, but it can become a poor neighbor for some crops.
Water, mulch, and feed the bed
Raised beds often drain faster than ground-level soil. The top few inches may look dry even when the lower soil stays wet. Check moisture by pushing your finger 2 inches into the soil before watering.
Water deeply at the soil line rather than spraying leaves. A soaker hose or drip line works well. Morning watering gives foliage time to dry and lowers the chance of fungal disease.
Basic watering guide
| Weather and crop stage | Watering approach |
|---|---|
| New seeds | Keep the top inch moist |
| Young seedlings | Water when the top 1 to 2 inches dry |
| Mature vegetables | Give about 1 inch per week, including rain |
| Hot, windy weather | Check daily; water deeply as needed |
| Heavy clay mix | Water less often and check before adding more |
Tomatoes, cucumbers, and squash need steady moisture when flowering and setting fruit. Uneven watering can cause tomato blossom-end rot, though calcium and root damage also play a role.
Apply 1 to 2 inches of straw, shredded leaves, or finished compost as mulch. Keep mulch 2 inches away from tomato and pepper stems. Thick, wet mulch touching stems can encourage rot and shelter slugs.
Fertilize based on plant need
Compost supports soil life, but it may not supply enough nitrogen for heavy feeders. If plants grow slowly and leaves turn pale green, use a soil test before adding fertilizer.
For general vegetables, a mild organic fertilizer such as 4-4-4 can work well. Follow the label rate. Too much nitrogen creates large leaves but fewer tomatoes, peppers, and beans.
Do not fertilize a newly filled bed heavily. Fresh compost may already contain enough nutrients for the first crop.

Maintain the bed through the seasons
A raised bed needs less work than a large in-ground plot, but it still needs care. Inspect the frame each spring, top up settled soil, clear weeds before they seed, and check the irrigation line for leaks.
In cold areas, leave healthy roots in the soil after harvest. They feed soil organisms as they break down. Remove diseased tomato vines, squash leaves, and plants covered with pests rather than composting them in a small home pile.
Seasonal maintenance schedule
| Season | Main tasks | What to watch for |
|---|---|---|
| Early spring | Repair boards, add compost, direct sow cool crops | Slugs, wet soil, frost |
| Late spring | Plant warm crops, install cages and trellises | Cutworms and transplant shock |
| Summer | Mulch, water, harvest often, prune tomatoes | Blossom-end rot, aphids, heat stress |
| Fall | Remove diseased plants, plant garlic or cover crops | Rodents and soil erosion |
| Winter | Check screws and covers, plan crop rotation | Snow load and standing water |
Rotate plant families when possible. Do not grow tomatoes, peppers, eggplants, or potatoes in the same spot every year. These members of the nightshade family can share diseases such as early blight and bacterial wilt.
Protect plants from pests
Raised beds do not stop pests by themselves. Slugs may hide under boards. Cabbage worms attack kale and broccoli. Aphids gather on new growth, and cucumber beetles can spread bacterial wilt.
Use insect netting over brassicas, hand-pick large pests, and inspect leaf undersides twice a week. Avoid broad insecticide sprays because they can harm bees, lady beetles, lacewings, and other beneficial insects.

Fix common raised bed problems
Most raised bed failures come from poor drainage, weak corners, bad soil, or overcrowding. The good news is that you can fix nearly all of them without rebuilding the whole bed.
Common problems and solutions
| Problem | Likely cause | Practical fix |
|---|---|---|
| Board bows outward | Thin lumber or wet soil pressure | Add a center brace or stronger board |
| Water pools at one end | Uneven ground or heavy soil | Level the site and add organic matter |
| Plants stay small | Poor soil, crowding, or low light | Test soil, thin plants, and check sun |
| Soil sinks fast | Compost or wood material still decomposing | Add settled topsoil and finished compost |
| Tomato leaves yellow | Wet roots, low nitrogen, or disease | Check moisture and inspect lower leaves |
| Slugs chew seedlings | Damp mulch and hiding places | Remove shelter, hand-pick, and use barriers |
| Ants nest in bed | Dry soil or nearby food source | Water deeply and inspect for aphids |
If the bed leaks soil through a large gap, empty the nearby area and add a short piece of board inside the corner. Secure it with exterior screws. Do not simply pile soil against a weak wall.
When the soil stays too wet
First, check whether the bed sits in a low part of the yard. Raised beds still collect water if the surrounding ground drains poorly. Move the bed if possible, or create a shallow drainage path around it.
Next, examine the soil mix. A high percentage of clay or fine compost can hold too much water. Mix in pine bark fines and finished compost, but do not add a large amount of sand to clay. That can create a dense, concrete-like mix.
When the soil dries too fast
Dark metal beds, windy rooftops, and beds filled with sandy soil can dry quickly. Add compost, apply mulch, and install drip irrigation. Water deeply enough to wet the full root zone.
Avoid daily light sprinkling on mature plants. It encourages shallow roots and creates more leaf wetness.

🔧 Quick Fix: Push a bamboo stake into the soil at several points. If it enters easily but comes out muddy, wait to water. If it stops in dry, hard soil, water slowly until moisture reaches the root zone.
Personal lessons from building 4×8 beds
My first 4×8 bed used untreated pine because it was inexpensive. It looked fine at first, but the end grain began to soften after three wet winters in a Zone 6 garden. The bed still grew food, yet the corners needed repair sooner than I expected.
A cedar bed in the same yard lasted much longer. I used 2×10 boards, four inside corner posts, and a center brace on each long side. After two seasons, the frame stayed square, but the soil dropped nearly 3 inches because the first compost load was too fresh.
I also learned not to plant four full-size tomato plants in one bed. They crowded the peppers, blocked airflow, and made early blight worse during a humid summer. Two indeterminate tomatoes with basil, lettuce, and a trellis gave a better harvest and made watering easier.
In a dry Zone 8 garden, I prefer drip tubing with 6-inch emitter spacing. In a wet Zone 5 garden, I use less mulch near the stems and check the soil before watering. The same bed design works in both places, but the soil and water plan must change.
Estimate time, cost, and lifespan
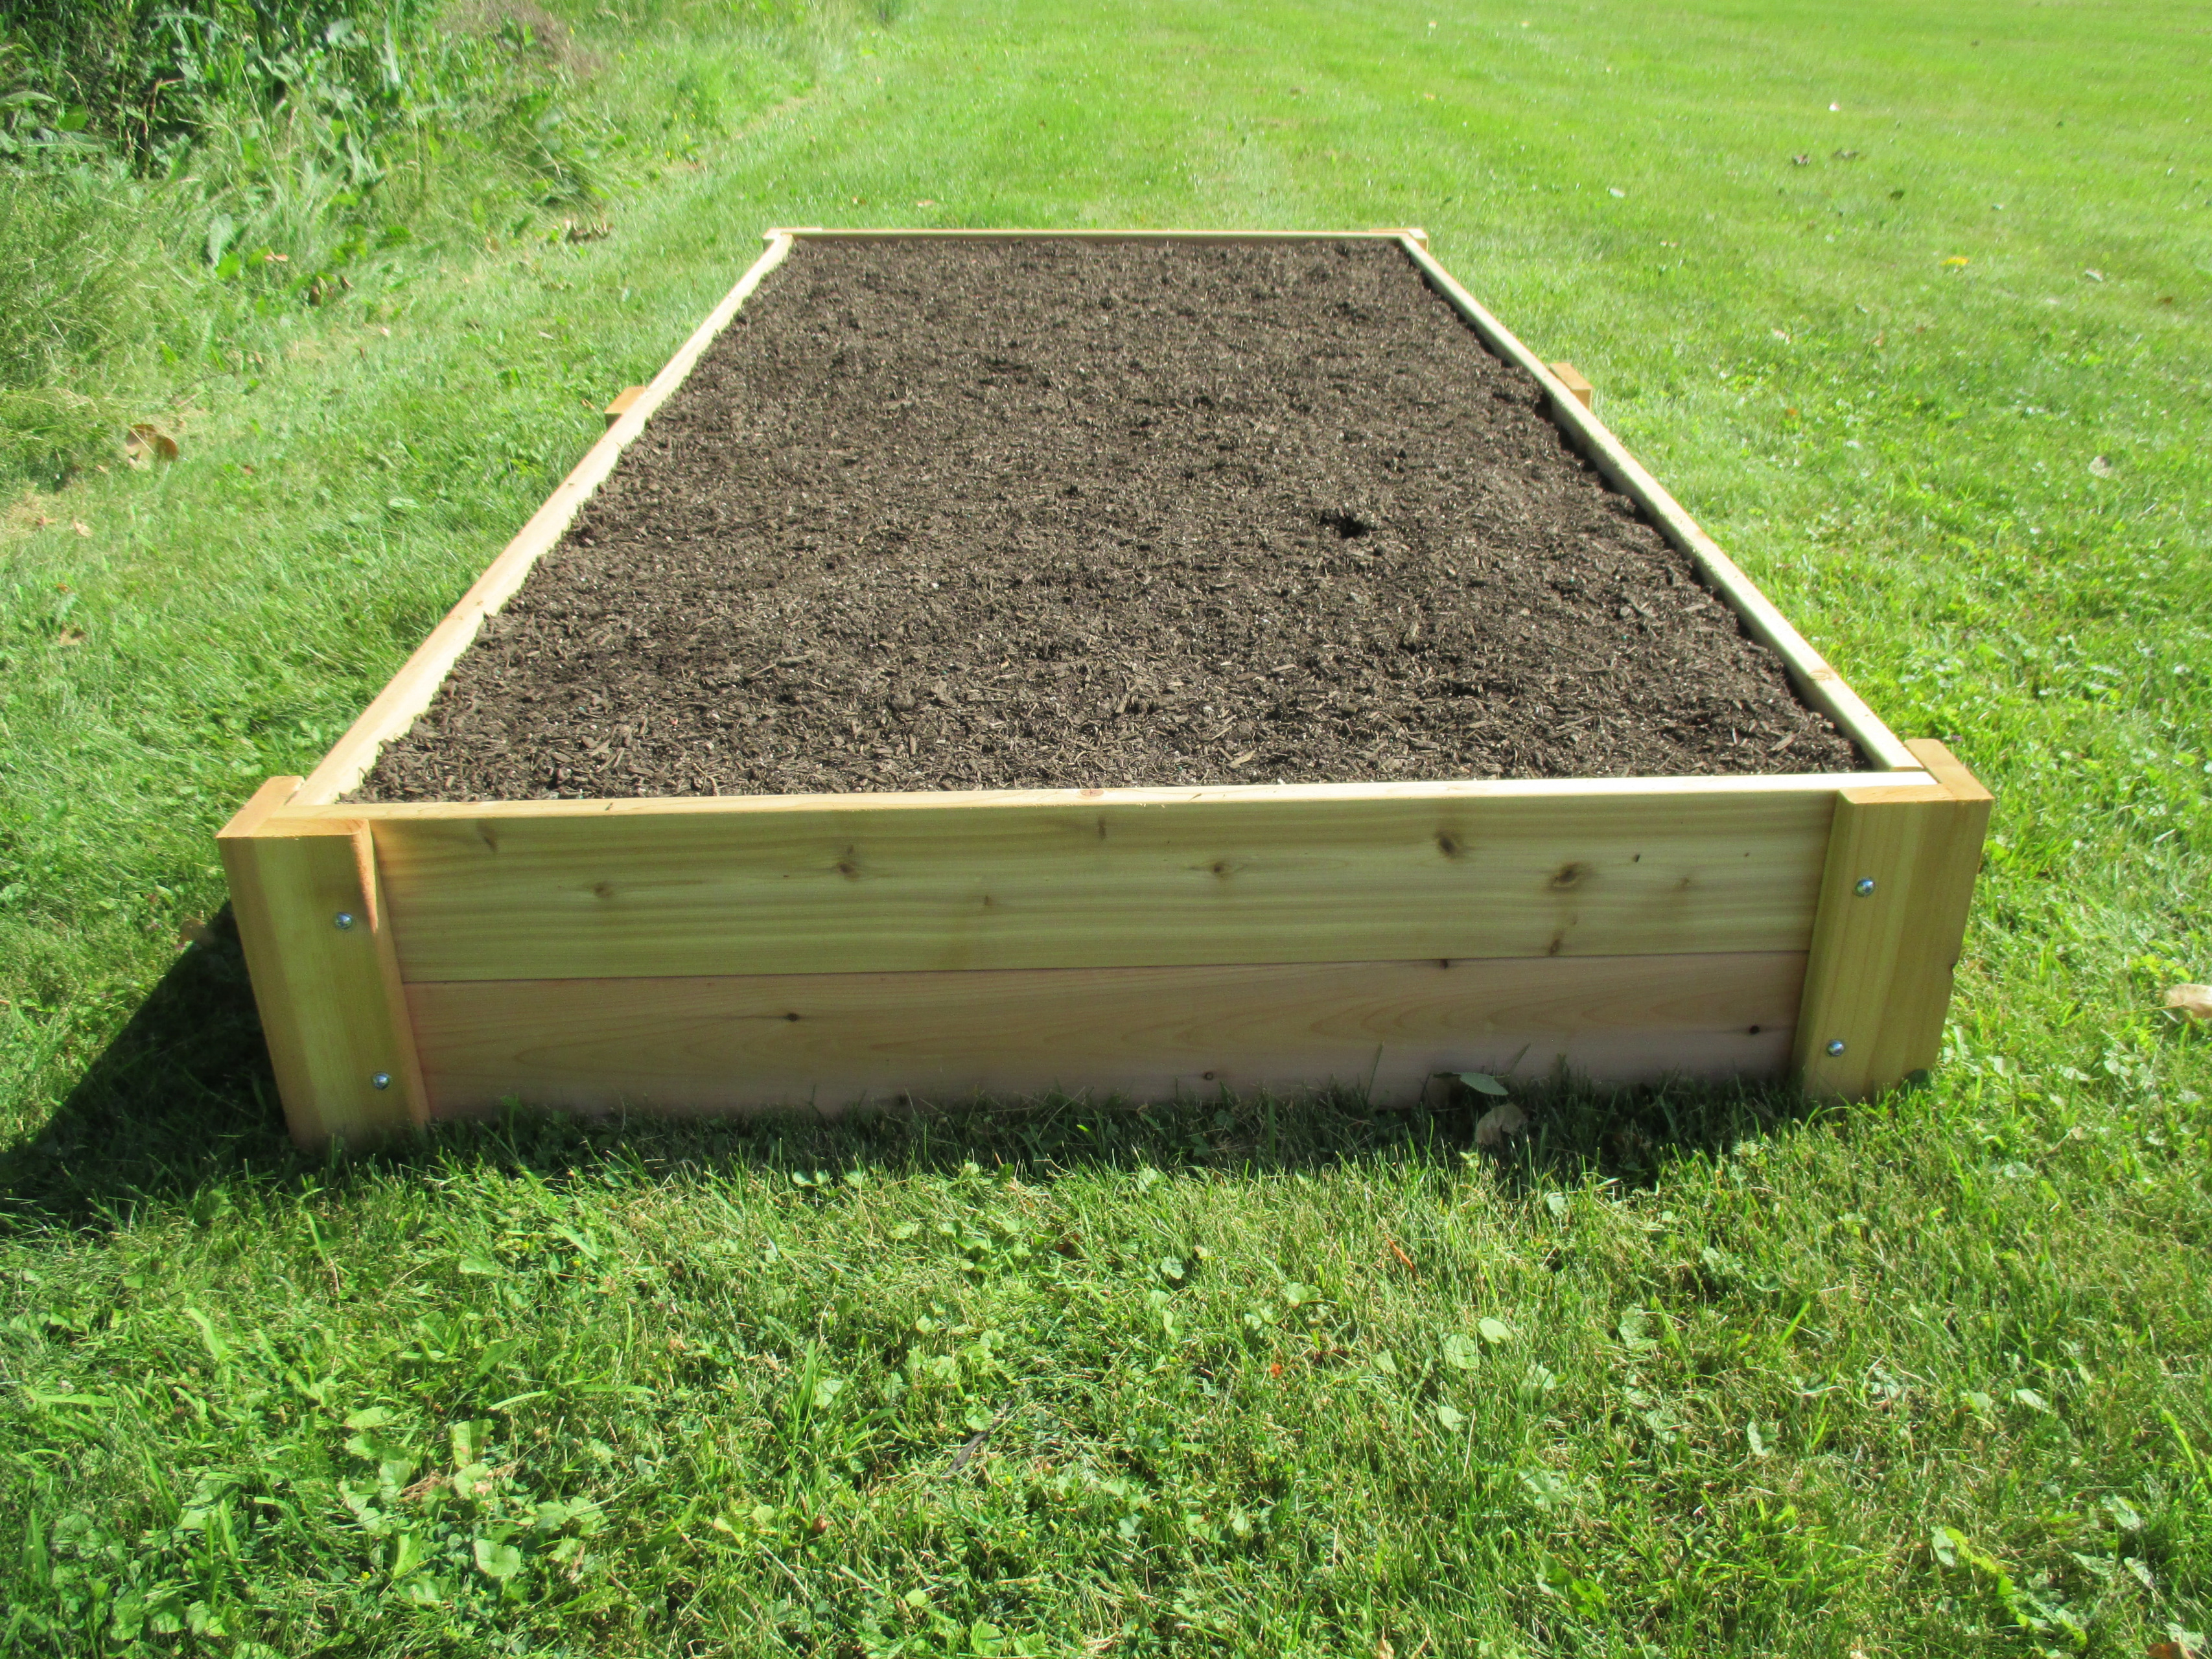
A simple 4×8 raised bed usually takes two to four hours to build if the site is ready. Add more time if you must remove sod, haul soil, cut lumber, or install irrigation.
Current pricing ranges from about $80 to $250 for the frame and fasteners, before soil. Cedar, composite, metal, and local lumber prices vary widely. Soil may cost another $100 to $300, especially when delivery is needed.
Typical project budget
| Project part | Low-cost range | Higher-cost range |
|---|---|---|
| Lumber and corner supports | $50–$130 | $150–$300 |
| Screws and hardware | $15–$40 | $50–$90 |
| Soil and compost | $80–$180 | $200–$400 |
| Mulch and irrigation | $20–$80 | $100–$200 |
| Total estimate | $165–$430 | $500–$990 |
The low end assumes pine, local bulk soil, and hand watering. The higher end includes cedar or metal, delivered soil, drip irrigation, and a trellis.
A cedar bed can last 7 to 15 years in many regions. Wet climates, poor drainage, sprinkler spray, and soil contact shorten that life. Composite and metal may last longer, but they cost more and have different heat and repair issues.

Avoid these beginner mistakes
Small mistakes can reduce harvests and shorten the life of the bed. Most are easy to prevent before you add the first shovel of soil.
- Building on an uneven site without leveling it.
- Using drywall screws instead of exterior structural screws.
- Filling the bed with pure compost.
- Planting large crops too close together.
- Putting tall crops on the south side.
- Watering by a fixed schedule without checking the soil.
- Adding lime or fertilizer without a soil test.
- Using landscape fabric under a bed on healthy soil.
- Leaving diseased plant debris in the bed.
- Forgetting a brace on a tall or long bed.
- Placing the bed too far from a hose.
- Using unknown reclaimed wood around food crops.
The most costly mistake is often the soil. Cheap fill dirt may contain weed seeds, clay, rubble, or contaminants. Ask for a soil analysis when buying bulk material, especially if the supplier cannot explain the mix.
Know when to hire help
Most people can build a 4×8 raised bed without professional help. Hire a landscaper if the site has major drainage problems, steep slopes, buried utility lines, or a retaining wall.
You may also want help with a 24-inch-high bed filled with soil. Wet soil is heavy, and a tall wall can fail if it lacks proper bracing. A professional can design drainage and safe retaining supports.
Call before digging if you plan to anchor posts deep in the ground. In the United States, contact 811 to check for underground utility lines. Wear eye protection when cutting lumber and keep hands clear of the saw blade.
Frequently asked questions
How many bags of soil do I need for a 4×8 raised bed?
A 12-inch-high 4×8 bed needs about 32 cubic feet before settling. Since most bags hold 1 or 2 cubic feet, you may need 16 to 32 bags. Bulk soil is often cheaper and creates less plastic waste.
Can I build a 4×8 raised bed directly on grass?
Yes. Mow the grass short, remove thick clumps, and cover the area with overlapping cardboard. Add soil on top. The cardboard will block light and break down as roots reach the native soil.
Do raised garden beds need a bottom?
No, not when placed on soil. An open bottom improves drainage and lets earthworms enter. A bottom is useful on a patio, deck, or contaminated site, but it must include drainage holes.
Is pressure-treated wood safe for a vegetable garden?
Modern residential pressure-treated lumber is commonly used for garden beds, but some gardeners still prefer untreated cedar. Never use old lumber with an unknown treatment, creosote, paint, or oil residue.
How long does a cedar raised bed last?
A cedar raised bed often lasts 7 to 15 years, but climate and drainage matter. Boards may rot first where they touch wet soil, especially at corners and end grain.
What is the best soil mix for a 4×8 raised bed?
Use about 60 percent quality topsoil, 30 percent finished compost, and 10 percent pine bark fines or another aeration material. Test the mix if possible, and aim for a vegetable-friendly pH near 6.0 to 7.0.
Can I grow tomatoes in a 4×8 raised bed?
Yes. Grow two large indeterminate tomatoes with strong cages or trellises. You can grow three or four determinate varieties, but leave enough space for airflow and root growth.
How often should I water a raised garden bed?
Check the soil every day during hot weather, but water only when the top 1 to 2 inches dry. Mature vegetables often need about 1 inch of water per week, including rain.
Why is my raised bed soil sinking?
Soil sinks when compost, wood fines, or other organic materials break down. Add more quality topsoil and finished compost after settling. Do not fill the bed with fresh wood chips or unfinished compost.
Can I use a raised bed on concrete?
Yes, but build it at least 12 inches deep, use a drainage-friendly soil mix, and make sure excess water can escape. Plants may need more frequent watering because roots cannot reach soil below the bed.
Should I paint or seal the inside of a raised bed?
Usually, no. Paint and sealers may peel or add unwanted chemicals. Good lumber, drainage, and a small gap between the bed and constantly wet ground do more to extend its life.
What should I plant in a 4×8 raised bed for beginners?
Start with lettuce, radishes, bush beans, basil, peppers, carrots, and one or two tomato plants. These crops are productive, easy to find, and forgiving when spacing or watering is not perfect.
Build it once, then improve it each season
A 4×8 raised garden bed is one of the most useful sizes for a home vegetable garden. It gives you enough room to grow a real mix of crops without creating a large maintenance job. Build the frame square, use safe lumber, fill it with balanced soil, and leave room for roots and airflow.
Start with a small crop plan rather than filling every square foot at once. Keep notes on what grew well, where water pooled, and which plants became crowded. After one season, you will know whether the bed needs a brace, a drip line, more compost, or a different crop layout.
The goal is not a perfect box. It is healthy soil, steady care, and fresh food close to your door.
Meta description: Learn how to build a 4×8 raised garden bed with clear steps, material lists, soil calculations, plant spacing, cost estimates, safety tips, and seasonal maintenance advice.