How To Build A U Shaped Raised Garden Bed: DIY Guide
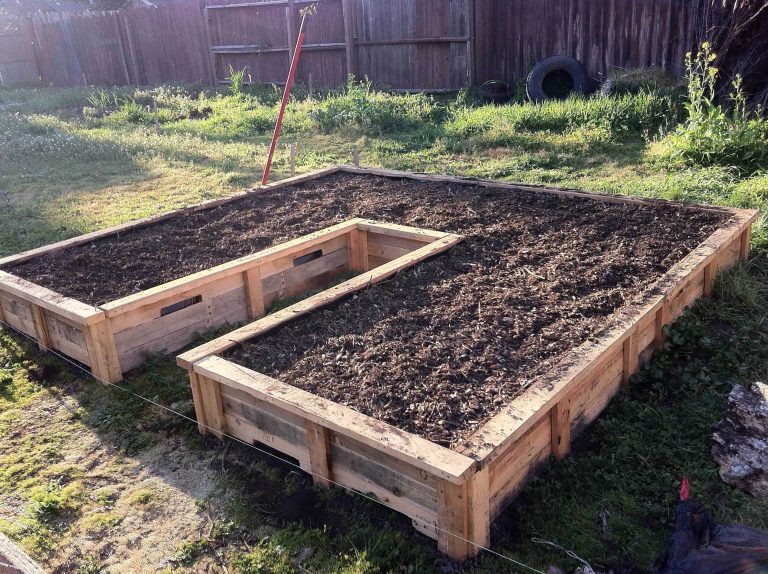
A U-shaped raised garden bed gives you a lot of planting space without making you step into the soil. The open center creates a clear path, while the two arms make every plant easy to reach. This layout works well for vegetables, herbs, flowers, and pollinator plants in small yards, patios, and community gardens.
I have built U-shaped beds from cedar, pine, and recycled composite boards. Cedar lasted the longest, but even untreated pine can work when the bed stays well drained and the boards sit above wet soil. The key is good planning: choose the right size, build a firm base, protect the wood, and fill the bed with healthy soil.

A U-shaped raised bed is simple to plan and build
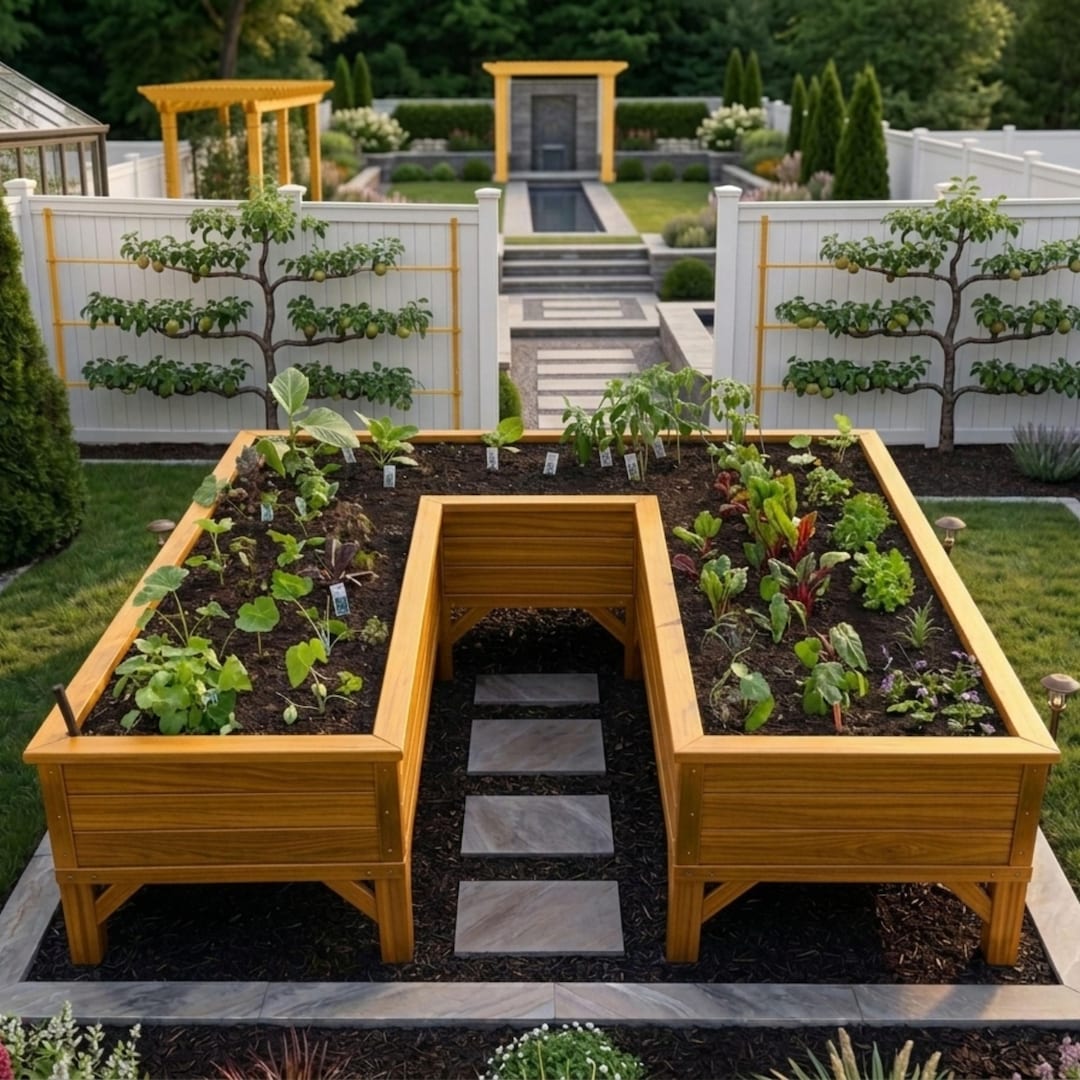
The best way to build a U-shaped raised garden bed is to make two long planting arms joined at the back, then leave a wide opening in front. Most home gardens work well with 2-by-8-foot arms, a 3-foot back section, and a 2- to 3-foot walking space inside the U.
This layout gives you three planting zones. It also keeps the middle open, so you can reach the soil from both sides without compacting it.
What the U shape does well
A U-shaped bed combines the main benefits of raised beds and garden paths. It lifts the soil above poor native ground, and it reduces the distance you must walk or stretch to reach plants.
The shape is useful for:
- Small yards
- Sloped or rocky ground
- Wheelchair-friendly gardens
- Herb gardens near a kitchen
- Vegetable beds with crop rotation
- Companion planting layouts
- Gardens with compacted clay soil
A standard bed can be hard to reach if it is more than 4 feet wide. A U bed solves that problem by keeping each arm narrow. You can plant lettuce, basil, carrots, beans, peppers, and tomatoes without climbing into the bed.
The main size rule
Keep each planting section no more than 4 feet wide. For easy access, 2 to 3 feet works even better. The inside path should be at least 24 inches wide, but 30 to 36 inches feels much better when you carry a bucket or wheelbarrow.
The total footprint depends on your space. A small U bed may measure 6 feet wide by 6 feet long. A larger family garden may measure 12 feet wide by 10 feet long.
Plan the layout before buying materials
Measure the site first, then draw the bed from above. A simple sketch helps you avoid blocked paths, bad sun exposure, and awkward corners.

The bed should receive at least six hours of direct sun for tomatoes, peppers, cucumbers, beans, and most root crops. Leafy greens can manage with four to six hours, especially in hot areas such as USDA Zones 8 through 10.
Pick the right location
Choose a level spot close to a water source. Carrying a hose across the yard is not a major task in spring, but it becomes a daily nuisance in July.
Avoid low areas where rain collects. Raised beds drain better than ground beds, but a bed placed in standing water can still stay wet. This causes root rot, fungus gnats, and weak plant growth.
Keep the bed away from large trees when possible. Tree roots can enter the soil from below, and tree canopies can reduce sunlight. Black walnut trees also release juglone, a compound that can harm some plants.
Check sun, wind, and access
Watch the site for one full day if you can. Morning sun may look strong, while a fence or wall may shade the bed by late afternoon.
In windy areas, place the closed back of the U toward the strongest wind. This can protect young plants, but do not place the bed where a solid wall blocks all air movement. Good airflow helps reduce powdery mildew and leaf diseases.
Leave enough room around the outside for mowing and trimming. I like to leave at least 24 inches between the bed and a fence. A 36-inch gap makes repairs and weed control much easier.
Choose the bed height
A 10- to 12-inch bed works for lettuce, herbs, beans, and many annual flowers. A 16- to 24-inch bed gives you more soil depth and reduces bending. It also costs more because you need more soil and stronger boards.
For carrots, parsnips, long beets, and daikon radishes, plan for at least 18 inches of loose soil. Strawberries, thyme, and shallow-rooted greens need much less.
| Bed height | Good uses | Main limitation |
|---|---|---|
| 8–12 inches | Greens, herbs, beans, flowers | Less root depth |
| 16–18 inches | Most vegetables and peppers | Higher soil cost |
| 20–24 inches | Accessibility and deep roots | Needs stronger support |
A taller bed is not always better. In my Zone 6 garden, a 12-inch cedar bed grows most crops well. I use taller beds only where bending is difficult or the native soil is contaminated.
Gather tools and materials
The basic materials are easy to find at a home center or lumber yard. Use outdoor-rated screws, not indoor drywall screws. Drywall screws rust fast and can snap under pressure.
Measure the total board length before you shop. Add 10 percent for cuts, mistakes, and damaged boards. Lumber sizes are often smaller than their listed size. A “2-by-8” board usually measures about 1½ by 7¼ inches.
Materials for a common U bed
The table below fits a U bed with two 2-by-8-foot arms, a 3-foot back, and 18-inch-high walls. Adjust the count for your own measurements.
| Material | Suggested amount | Why you need it |
|---|---|---|
| Cedar or untreated pine boards | 12–16 boards | Bed walls |
| Exterior screws, 3 inches | 1 box | Board connections |
| Corner posts, 2-by-2 or 4-by-4 | 6–10 pieces | Strength and alignment |
| Landscape fabric or cardboard | Site amount | Weed barrier |
| Compost and garden soil | See soil formula | Filling the bed |
| Mulch or straw | 2–3 inches | Moisture control |
Use cedar, redwood, or another naturally rot-resistant wood if your budget allows. Eastern red cedar and black locust can last many years, but they may cost more or be harder to find.
Untreated pine is a lower-cost choice. In my experience, pine often lasts three to seven years, depending on rain, soil contact, and drainage. Cedar may last 10 years or more when the bed drains well.
Select safe fasteners
Use hot-dipped galvanized or stainless-steel screws. Stainless screws cost more, but they resist rust well in wet climates and coastal areas.
Choose 3-inch screws for joining wall boards to corner posts. Pre-drill near board ends to reduce splitting. This matters most with cedar, which can crack when you drive screws too close to an edge.
Do not use old pressure-treated boards from unknown sources. Modern treated lumber is generally accepted for garden use, but avoid boards that contain peeling coatings, oily residue, or unknown chemicals.
Tools to keep nearby
You do not need a large tool collection. A circular saw speeds the work, but a handsaw can handle a small bed.
Useful tools include:
- Tape measure
- Carpenter’s square
- Pencil or marking knife
- Level
- Drill and driver bits
- Circular saw or handsaw
- Rubber mallet
- Shovel and garden rake
- Wheelbarrow
- Work gloves
- Safety glasses
- Hearing protection when using a saw
A battery drill such as a 20-volt DeWalt or Makita model works well for this job. A corded drill also works, but keep the cord away from the cutting area.
Build the U-shaped frame step by step
Build the frame on a flat surface when possible. Then move it into place or assemble it in sections. A large frame can become heavy before you add soil.

The steps below describe a sturdy 18-inch-high bed with three board layers. You can use two layers for a bed that is about 12 inches high.
1. Mark the footprint
Mark the outside corners with stakes and string. Confirm the length, width, and opening before you cut any boards.
Measure the inside path, not just the outside shape. A 24-inch opening can feel tight once plants grow over the edges. I prefer a 30-inch inside path for regular garden access.
Check the diagonals of each rectangular section. If both diagonal measurements match, the corners are square. This small check saves time later.
2. Prepare the ground
Remove tall grass, weeds, rocks, and large roots. You do not need to dig out every blade of grass, but remove perennial weeds such as quackgrass, bindweed, and bermudagrass.
Level high spots with a shovel. Do not fill low spots with loose soil alone, because the bed may settle unevenly.
For a lawn site, mow the grass short and cover it with overlapping cardboard. Use plain brown cardboard without tape, glossy ink, or plastic coating. Water it before adding the bed.
3. Cut the boards
Cut the long side boards first, then the shorter end boards. Label each piece with its location. This prevents confusion when several boards look alike.
Use a square to mark each cut. A crooked cut can create gaps, but small gaps are not a major problem. Plants care more about good soil and drainage than perfect corners.
Sand sharp edges lightly. This takes only a few minutes and helps prevent splinters.
4. Assemble the first layer
Lay out the bottom boards along the marked lines. Join each corner with an interior post or an exterior bracket.
Keep the boards level as you work. Check both length and width before driving every screw. A small error in the first layer becomes a large error by the third layer.
For a U shape, build the two arms and the back section as one frame if it remains manageable. Otherwise, build three sections and join them in place.
5. Add the second and third layers
Stagger the seams between layers. Do not place all vertical joints above one another. Staggered seams spread pressure and make the wall stronger.
Drive two screws at each board-to-post connection. On long sides, add a center support post every 4 feet. Tall beds can bow outward when filled with damp soil.
Check the level after each layer. If the frame is slightly out of level, fix it now with soil or a thin shim under the low side.
6. Reinforce long walls
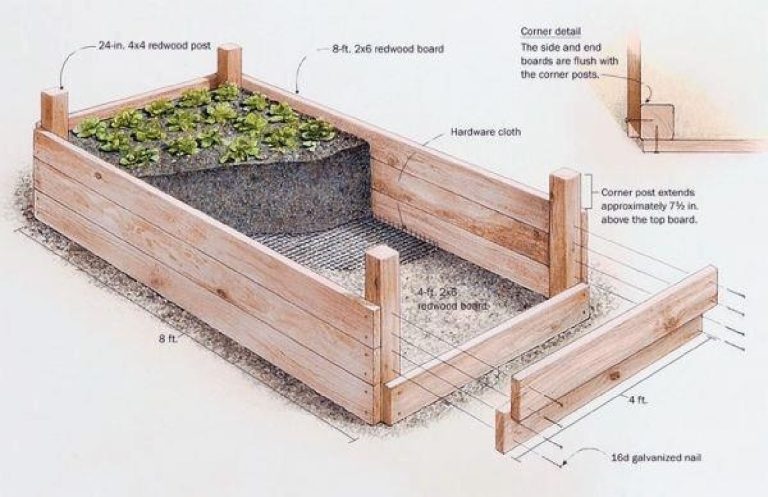
Long walls need extra support. Add 4-by-4 corner posts or 2-by-2 stakes at the inside corners. For beds longer than 8 feet, add a cross brace or internal tie.
An internal tie can run from one side wall to the other below the soil line. Use rot-resistant wood or a galvanized metal rod. Keep metal edges covered so they do not cut hands or damage tools.
A 24-inch-high bed filled with wet soil creates much more outward force than a 12-inch bed. Do not rely on thin boards and a few screws for a tall structure.
7. Add a weed barrier
Place cardboard or woven landscape fabric under the bed. Overlap cardboard sheets by at least 6 inches.
Avoid sealing the bottom with plastic. Plastic blocks drainage and can create a wet layer under the bed. A raised bed needs a way for extra water to move into the native soil.
If you place the bed on concrete, use a container-style liner with drainage holes instead. A concrete bed needs more frequent watering because it cannot draw moisture from the ground.
8. Finish the walking path
The inside path should drain well and stay free of mud. Wood chips, arborist chips, gravel, straw, or pavers can all work.
Do not use fine gravel over heavy clay if the path sits in a low spot. It may hold water instead of shedding it. Coarse wood chips often work better in wet climates.
Leave a small gap between path material and the top of the bed. This reduces splashback onto leaves during rain.
Fill the bed with healthy soil
Good soil matters more than a fancy frame. A raised bed will not fix poor soil if you fill it with dense clay, fresh manure, or cheap material that settles heavily.

Use a blend that drains well but still holds water. A simple mix for most vegetables contains screened topsoil, finished compost, and a light organic material such as aged leaf mold.
A reliable soil blend
For a general vegetable bed, use:
- 60 percent screened topsoil
- 30 percent finished compost
- 10 percent leaf mold, aged bark fines, or coarse coconut coir
In dry climates, you can use a little more compost or leaf mold. In wet climates, avoid adding large amounts of fine compost, which can hold too much water.
Do not fill the bed with pure compost. Compost shrinks as it breaks down, and some compost products contain too much salt. A soil test can show pH, phosphorus, potassium, calcium, and organic matter.
Most vegetables prefer a soil pH between 6.0 and 7.0. Blueberries need a more acidic mix, so they usually belong in a separate container or bed.
Calculate how much soil you need
Measure length, width, and depth in feet. Multiply the three numbers to get cubic feet.
For a U bed, calculate the two arms and the back section, then subtract the open center. A bed with 40 square feet of planting area and 1.5 feet of soil needs about 60 cubic feet of mix.
One cubic yard equals 27 cubic feet. That example needs about 2.2 cubic yards, with a little extra for settling.
| Bed area | Soil depth | Approximate soil needed |
|---|---|---|
| 24 square feet | 12 inches | 0.9 cubic yard |
| 40 square feet | 18 inches | 2.2 cubic yards |
| 60 square feet | 18 inches | 3.3 cubic yards |
Buy a little extra soil if the mix will settle. After four weeks of watering and rain, the level may drop by 2 to 4 inches.
Add soil in layers
Add soil in 4- to 6-inch layers. Water each layer lightly, then rake it smooth.
Do not pack the soil by walking on it. That destroys air spaces and makes root growth harder. Let gravity settle the mix instead.
You can place untreated logs, branches, or leaves in the lower part of a very deep bed. This method, often called hügelkultur, can reduce soil cost, but it also causes uneven settling. Keep the top 12 to 18 inches as high-quality soil for vegetables.
Plant the U bed for easy care
The shape makes a good planting map. Place tall crops on the north side so they do not shade shorter plants. Use the inner edges for herbs and greens that you harvest often.

A U bed also makes companion planting simple. You can place basil near tomatoes, dill near cabbage-family crops, and flowers such as calendula or alyssum near crops that benefit from pollinators.
Plan by plant height
Use the outer and back edges for tall plants such as tomatoes, trellised cucumbers, pole beans, and okra. Put medium plants such as peppers, kale, Swiss chard, and bush beans in the middle.
Place low crops near the path. Lettuce, spinach, radishes, carrots, onions, thyme, and strawberries stay easy to reach.
Do not crowd plants because the bed looks empty at first. Tomato plants such as ‘Cherokee Purple’ and ‘Sungold’ can spread 3 feet or more. Give them strong cages or a trellis.
Match crops to the season
A U bed can produce food through much of the year, but the schedule varies by USDA zone.
In Zones 3 through 5, start cool crops such as peas, kale, and spinach early. Plant tomatoes and peppers after the last spring frost. Use row cover to extend the season.
In Zones 6 and 7, you can often grow spring greens, warm-season crops, and a fall crop of carrots or broccoli. In Zones 8 through 10, protect leafy greens from intense summer heat and focus on cool-season planting in fall and winter.
| Season | Crops to plant | Main task |
|---|---|---|
| Early spring | Peas, radish, spinach, lettuce | Protect from frost |
| Late spring | Tomatoes, peppers, beans, basil | Add supports and mulch |
| Summer | Cucumbers, squash, herbs, flowers | Water deeply and watch pests |
| Fall | Kale, carrots, beets, broccoli | Remove spent warm crops |
Rotate plant families each season when space allows. Avoid planting tomatoes, peppers, eggplants, and potatoes in the same section year after year. These crops all belong to the nightshade family and can share diseases.
Use vertical space
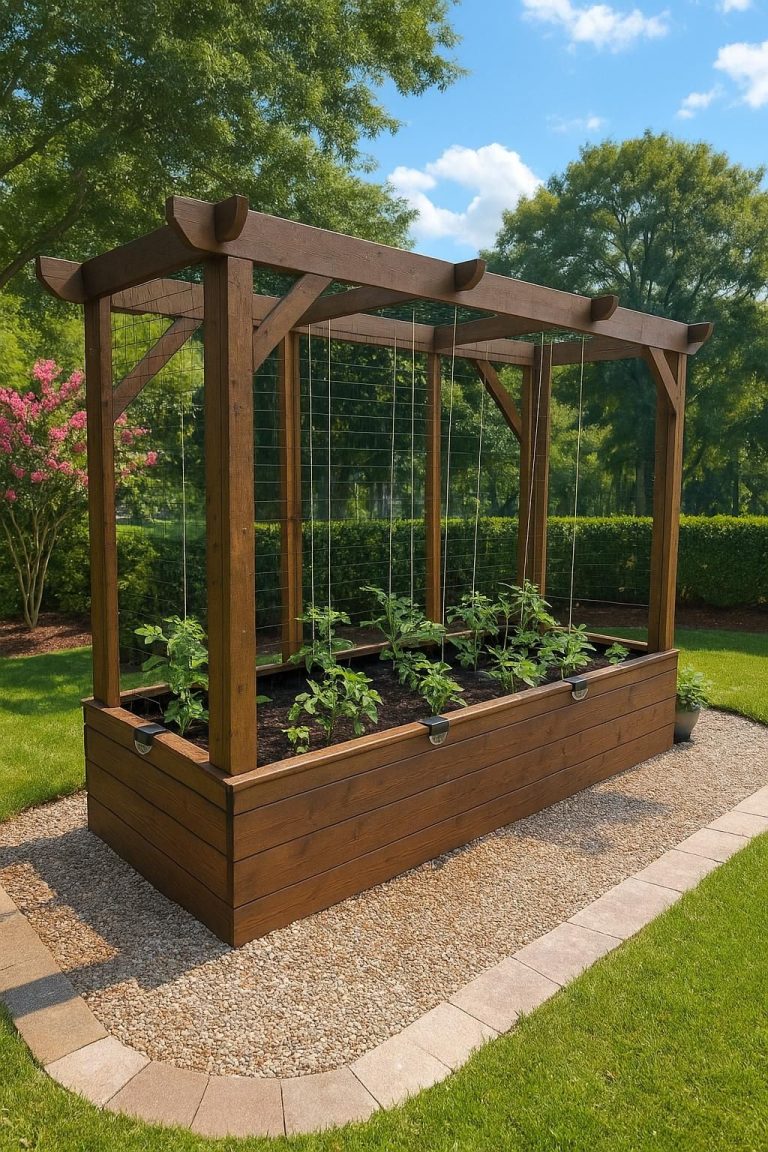
A trellis on the back of the U can grow cucumbers, peas, pole beans, or small melons. Make sure it can support mature vines and wet fruit.
Install the trellis before planting. Adding it later can disturb roots and crush nearby stems.
Keep vines off the walking path. A cucumber vine that spills into the center can turn a clear path into a daily obstacle.
Water and fertilize without waste
A raised bed often dries faster than ground soil, especially when it sits above hot pavement or uses a light soil mix. Water the root zone, not the leaves, and check the soil before you turn on the hose.

Push a finger 2 inches into the soil. If it feels dry at that depth, water slowly until moisture reaches 6 to 8 inches down.
Build a simple watering plan
Most vegetables need about 1 inch of water per week from rain and irrigation. During hot, windy weather, tomatoes, cucumbers, and squash may need more.
Drip irrigation or soaker hoses work well in U-shaped beds. Run a line along each arm and one across the back. Use a timer with a filter and pressure regulator.
Water early in the morning. Evening watering can leave leaves wet for hours and may increase disease pressure.
| Plant group | Normal watering need | Best method |
|---|---|---|
| Lettuce and herbs | Light, frequent moisture | Drip or hand watering |
| Tomatoes and peppers | Deep, steady moisture | Soaker hose |
| Beans and cucumbers | Even moisture during flowering | Drip lines |
| Thyme and rosemary | Let soil dry slightly | Hand watering |
Mulch with 2 inches of straw, shredded leaves, or clean compost. Keep mulch 2 inches away from plant stems to reduce rot and slug damage.
Feed plants based on need
A soil test gives better advice than a guess. If you need a general starting point, mix a modest amount of finished compost into the top layer before planting.
Leafy greens need nitrogen for leaf growth. Tomatoes and peppers need steady nutrition but can grow too much foliage if you add excessive nitrogen.
A balanced organic fertilizer such as 5-5-5 can work for mixed beds. Follow the label rate. More fertilizer does not mean more harvest; it can burn roots and pollute runoff.
Do not add fresh manure. It can burn plants and may carry pathogens. Use composted manure that has fully heated and aged.
Prevent common U-shaped bed problems
Most raised bed problems come from poor drainage, weak walls, bad soil, or overcrowded plants. Fixing the cause works better than treating the symptom.

Inspect the bed once each week. Look for leaning walls, cracked boards, standing water, wilted leaves, chewed foliage, and weeds that escaped the first cleanup.
Troubleshooting table
| Problem | Likely cause | Practical fix |
|---|---|---|
| Walls bow outward | Long span or weak supports | Add posts and cross braces |
| Soil stays wet | Heavy mix or blocked drainage | Add coarse organic matter and check the base |
| Plants wilt in wet soil | Root stress or root rot | Reduce watering and improve drainage |
| Soil sinks quickly | Too much compost or loose fill | Top up with soil and compost |
| Slugs chew leaves | Damp mulch and shade | Water early, thin mulch, hand-pick |
| Tomatoes split | Uneven moisture | Keep watering steady |
Do not assume wilt always means dry soil. A plant with root rot can wilt in saturated soil because damaged roots cannot move water.
Control weeds without herbicide
Pull weeds when they are small. A thick mulch layer reduces new weeds, but perennial weeds can still grow through it.
If bindweed, bermudagrass, or quackgrass returns from below, remove the bed soil near the roots and dig out as much as possible. Cardboard alone will not stop a strong rhizome.
Avoid spraying broad herbicides near food crops. Hand pulling, mulch, and careful bed preparation are safer long-term choices.
Manage pests and disease
Inspect the underside of leaves for aphids, whiteflies, spider mites, and cabbage worms. A strong stream of water can remove aphids from sturdy plants.
Use floating row cover over kale, broccoli, and cabbage to block cabbage moths. Remove the cover when squash, cucumbers, or beans need pollination.
Good spacing and airflow reduce powdery mildew and fungal leaf spots. Remove diseased leaves, clean tools, and do not compost plants with serious disease unless your compost pile reaches a reliable high temperature.
Maintain the bed through the seasons
A U-shaped raised garden bed can last for years with simple care. The frame needs more attention than the plants because wood slowly absorbs water and expands, shrinks, and cracks.

In my Zone 6 garden, I inspect the beds in early spring and again after the main summer harvest. This catches loose screws and soft wood before the walls fail.
Seasonal maintenance schedule
| Time | Maintenance work | What to check |
|---|---|---|
| Early spring | Top up soil and repair boards | Frost movement and loose joints |
| Late spring | Add mulch and check irrigation | Dry soil and clogged emitters |
| Mid-summer | Re-tension supports and weed | Bowing walls and pests |
| Fall | Remove diseased plants and clean tools | Rot, plant debris, and standing water |
| Winter | Store loose tools and hoses | Freeze damage and snow load |
Do not leave diseased tomato vines in the bed over winter. Remove them and clean cages with soap and water.
How long the frame lasts
Untreated pine may last three to seven years. Cedar often lasts eight to 15 years, and high-quality redwood or black locust can last longer.
The first parts to fail are usually the bottom boards, inside corners, and screw holes near wet soil. Good drainage can add years to the frame.
Do not seal the inside with a toxic wood coating. If you use a finish, choose one labeled for exterior garden use and allow it to cure fully before adding soil.
Repair weak or rotten boards
If one board becomes soft, remove the soil beside it and replace the board. Do not wait until the entire wall leans.
For a small split, add a structural screw and an exterior repair plate. For serious rot, replace the board and inspect nearby posts.
If the bed has shifted, empty part of the soil before correcting it. Trying to push a full bed back into place can break boards and injure your back.
Decide whether to build, buy, or choose another design
A DIY U bed gives you more control over size and materials. A kit saves time but may limit the layout and often costs more per square foot.

A U-shaped bed is not right for every site. A simple rectangle may work better in a narrow yard, while a keyhole bed may suit a dry climate or a kitchen garden.
| Option | Best for | Trade-off |
|---|---|---|
| DIY U bed | Custom size and lower material cost | Requires tools and labor |
| Modular U kit | Fast setup and clean parts | Higher cost and fixed sizes |
| Rectangular bed | Simple spaces and low cost | Less access in wide beds |
| Keyhole bed | Compact access and small yards | Less room for large crops |
Choose a raised bed kit if you do not own tools, cannot cut lumber safely, or need a quick setup. Check the board thickness, fastener type, warranty, and actual inside dimensions.
Choose a ground-level garden if your native soil drains well and bending is not a concern. It costs less and supports deeper root systems without buying imported soil.
Choose large containers for patios, balconies, and rental homes. Containers offer portability, but they dry out faster and hold less soil.
Weigh the main pros and cons
The U shape improves access, but it uses more lumber than a rectangle. It also creates more corners, and corners need careful fastening.
| Pros | Cons |
|---|---|
| Easy reach from several sides | More cuts and corner joints |
| Clear center path | More expensive than one rectangle |
| Good for companion planting | Takes more floor space |
| Works well for accessibility | Needs strong support when tall |
| Separates crop groups | Can dry out at exposed edges |
For me, the access benefit outweighs the extra work when I grow many herbs and salad crops. If you only want three tomato plants, a small rectangular bed will be simpler.
Improve the design with a few practical details
Small design choices can make the bed easier to use for years. Think about your hands, knees, hose, wheelbarrow, and plants before you build.

Add a comfortable path surface
Wood chips feel soft and are easy to renew. Gravel drains well but can roll into the bed. Pavers create a firm surface for a garden cart or wheelchair.
For an accessible bed, make the path at least 36 inches wide. Keep the bed height near 24 inches if a seated gardener will use it, and avoid sharp corner posts.
Install edging or a ledge
A 4-inch ledge along the top can hold a cup, seed tray, or hand tool. It also gives you a place to sit while harvesting.
Use a wide, smooth board and round the edges. Avoid making the ledge so wide that it shades small plants.
Add a cold-frame cover
You can place hoops over one arm of the U bed and add frost cloth or clear plastic. Secure the cover against wind, but leave ventilation on sunny days.
Clear plastic can heat a bed quickly. Open it when the inside temperature rises above about 75°F for cool-season crops.
Label crop sections
Use durable plant labels or a simple map. Mark the planting date, variety, and fertilizer used.
This helps you compare ‘Roma’ tomatoes with ‘Sungold’ tomatoes, or track where you planted brassicas. It also makes crop rotation much easier next season.
My experience building and growing in U beds
The first U bed I built was too narrow inside. The 24-inch path looked fine on paper, but a tomato cage and a full watering can made it feel cramped. I rebuilt the front opening at 32 inches, and daily harvests became much easier.
I also made the mistake of using too much compost. The plants grew fast, but the soil settled nearly 5 inches after one season. The next bed used more screened topsoil and leaf mold, and it held its level much better.
Cedar performed well through wet winters, but the bottom boards still darkened where mulch touched them. Pulling mulch back from the walls by 2 inches helped. In contrast, my untreated pine test bed showed soft spots after five wet seasons.
A U bed also changed how I plant. I now keep perennial herbs such as thyme, sage, and chives near the outer corners, where they do not interfere with annual crop rotation. I place lettuce and radishes along the inner path because I can harvest them often without stepping into the bed.
Estimate time and cost before you start
A small DIY U bed usually takes one weekend. Cutting and assembly may take four to eight hours, while soil delivery and filling can take another two to four hours.
Current pricing ranges from about $150 to $400 for lumber, fasteners, and supports. Soil can add $150 to $500 or more, depending on bed size, delivery fees, and local material prices.
Cedar costs more than pine, but replacing a rotten wall takes time and disturbs roots. If you plan to garden in the same place for at least five years, stronger lumber often makes sense.
The largest cost surprise is soil. Calculate cubic feet before buying. A tall U bed may need several cubic yards, and bagged soil costs far more than a bulk delivery.
Avoid these beginner mistakes
Many first-time builders make the same few errors. Each one is easy to prevent with a short planning check.

Making the arms too wide
A 5-foot-wide arm may look productive, but you cannot reach the center without stepping into the bed. Keep the planting width under 4 feet, and use 2 to 3 feet when access matters most.
Skipping support posts
Soil is heavy. Wet soil is heavier. Add posts at corners and along long walls before filling the bed.
Using fresh manure
Fresh manure can burn roots and may contain harmful bacteria. Use mature compost or fully composted manure instead.
Blocking drainage
Plastic sheeting under a bed can trap water. Use cardboard or breathable landscape fabric on soil, and add drainage holes when the bed sits on concrete.
Planting too much
A full bed can become a jungle by July. Follow mature spacing, not the size of young seedlings. Crowded plants compete for light and air.
Forgetting the sun path
A trellis on the wrong side can shade the whole bed. Put tall crops and supports on the north side in the Northern Hemisphere.
🌱 Beginner Note: Start with a bed that is 12 inches high and no more than 8 feet long. It is easier to build, cheaper to fill, and large enough to teach you what works in your soil and climate.
Know when to hire help
You can build most U-shaped beds yourself, but hire help for difficult sites. A contractor or skilled carpenter may be useful when the bed sits on a steep slope, needs a retaining wall, or must meet accessibility requirements.
Ask for help if you cannot safely operate a circular saw, lift lumber, or move bulk soil. A friend with a wheelbarrow can reduce a full day of hard work.
You may also need professional advice if the site has possible lead, industrial contamination, or unknown fill. In that case, test the soil before growing food. Use a lined bed with clean soil if contamination is confirmed.
FAQs about building a U-shaped raised garden bed
How wide should a U-shaped raised bed be?
Keep each planting arm 2 to 4 feet wide. A 2- to 3-foot width gives the best access. Make the center path at least 24 inches wide, or 30 to 36 inches for a wheelbarrow or wheelchair.
How deep should a U-shaped raised bed be?
Use 10 to 12 inches for herbs, greens, and shallow-rooted crops. Use 16 to 24 inches for tomatoes, peppers, carrots, and better accessibility.
Should a raised bed have a bottom?
A bed placed on soil usually should not have a solid bottom. Use cardboard or breathable landscape fabric to slow weeds. Add a bottom only when the bed sits on concrete, wood, or another hard surface, and include drainage holes.
What is the best wood for a raised garden bed?
Cedar, redwood, and black locust resist rot well. Untreated pine costs less but often needs replacement sooner. Use exterior-rated galvanized or stainless-steel screws with any wood.
Can I build a U-shaped bed on grass?
Yes. Mow the grass short, remove large roots, and cover the area with overlapping plain cardboard. Set the frame level, then fill it with quality soil. Persistent weeds may need more removal.
How much soil does a U-shaped bed need?
Multiply the total planting area by the soil depth in feet. Then divide the result by 27 to convert cubic feet into cubic yards. Add about 10 percent because soil settles after watering.
Can I use pressure-treated lumber?
Modern pressure-treated lumber is commonly used for outdoor structures, but avoid old or unknown boards. Choose lumber approved for exterior use, and do not burn scraps from treated wood.
Why is my raised bed soil sinking?
Soil sinks when compost, leaves, wood, or loose fill breaks down. Top up the bed with screened topsoil and finished compost. Avoid filling the entire bed with compost.
How often should I water a raised bed?
Check the soil 2 inches below the surface. Water when it feels dry, then soak the root zone deeply. During hot weather, many beds need water every one to three days, but rainfall and soil type change the schedule.
Can I grow tomatoes in a U-shaped raised bed?
Yes. Give each tomato 2 to 3 feet of space, add a cage or trellis, and keep watering steady. Good varieties include ‘Sungold,’ ‘Cherokee Purple,’ ‘Roma,’ and ‘Celebrity,’ though performance varies by climate.
Is a U-shaped bed better than a rectangular bed?
A U-shaped bed is better for access, crop grouping, and a central work path. A rectangular bed is cheaper and simpler. Choose the U shape when you have enough floor space and want to reach many plants without stepping on soil.
How long does a U-shaped raised bed last?
Pine may last three to seven years. Cedar often lasts eight to 15 years, depending on moisture and construction. Good drainage, strong supports, and keeping mulch away from the walls can extend the life.
Build for access, soil health, and steady harvests
A well-planned U-shaped raised garden bed is more than a wooden frame. It is a small growing system with clear paths, manageable soil, and room for smart crop rotation.
Start with a level sunny site, keep the arms narrow, reinforce long walls, and spend time on the soil mix. Use drip irrigation, mulch, strong supports, and seasonal planting to keep the bed productive.
The layout does take more work than a basic rectangle. For gardeners who value easy reach, clean paths, and a wide mix of crops, that extra work pays off every time you harvest without stepping into the bed.
Meta description: Learn how to build a U-shaped raised garden bed with clear plans, tools, materials, soil formulas, planting tips, cost estimates, and maintenance advice.