How To Fix A Raised Garden Bed: Easy DIY Repair Guide
A raised garden bed can fail in many ways. Boards may bow, corners may pull apart, soil may sink, water may stop draining, or weeds may grow through the bottom. Most repairs do not need a full rebuild. If the frame still feels solid, you can often fix the bed in one afternoon with a few tools, fresh soil, and better drainage.
I have repaired cedar, pine, composite, and metal raised beds in dry Colorado gardens, wet Pacific Northwest yards, and heavy clay soil in the Midwest. The right fix depends on the damage, the material, the bed size, and the weight of the soil inside. A small 4-by-4-foot bed needs a different repair than a long 4-by-12-foot bed filled with wet soil.
This guide explains how to find the real cause, repair the frame, restore the soil, improve drainage, and prevent the same problem next season.

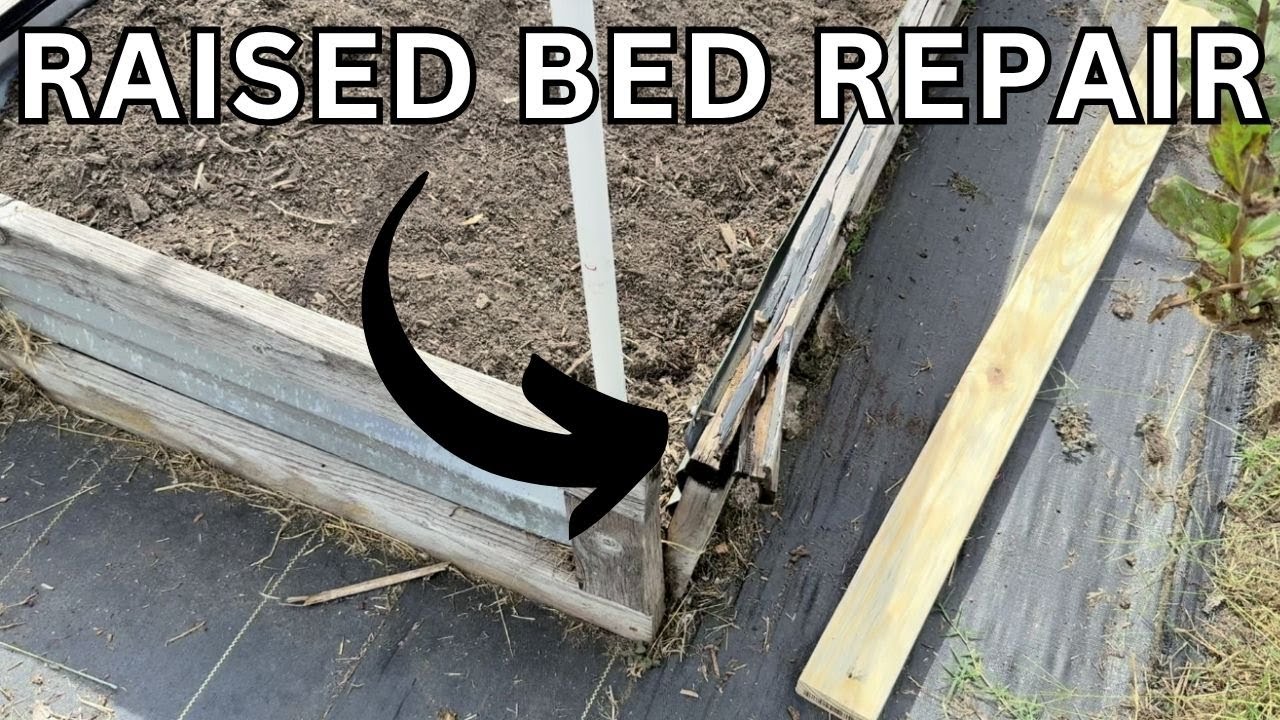
Quick answer: how to fix a raised garden bed
To fix a raised garden bed, first remove plants and enough soil to expose the damaged area. Tighten or replace loose fasteners, brace long sides, rebuild weak corners, and add drainage holes if water pools. Replace rotten boards instead of covering them. Refill with a mix of topsoil, compost, and aeration material, then level and mulch the bed.

Why raised garden beds fail
Raised beds usually fail because soil creates constant outward pressure. Wet soil weighs much more than dry soil, and a long side wall can slowly bow under that load. Freeze-thaw cycles, poor fasteners, wood rot, and soft ground make the stress worse.
A bed can also seem damaged when the real issue sits below it. Uneven ground may twist the frame. A clogged liner may hold water against wood. Settled soil may make one corner look low even when the boards remain straight.
The most common causes
The first step is to identify the cause before you buy materials. A new screw will not solve rot, and more soil will not solve a clogged drain.
| Problem | Likely cause | First repair to try |
|---|---|---|
| Side wall bows outward | Long span, wet soil, weak board | Add an interior brace or replace the board |
| Corner opens | Short screws, shifted soil, poor joint | Realign and use exterior structural screws |
| Wood feels soft | Rot, trapped moisture, soil contact | Replace damaged wood and improve drainage |
| Water stays on top | Compacted soil, blocked liner, poor site slope | Loosen soil and add drainage paths |
| Bed sinks on one side | Soft soil, roots, erosion, poor base | Empty the bed and reset the base |
| Soil level drops fast | Compost decomposition, settling, leaks | Top up with soil and inspect the frame |
The takeaway is simple: repair the structure first, then repair the soil. If you refill the bed before fixing the frame, the new soil will push on the same weak points.
Check the damage before you start
A good inspection takes 10 to 15 minutes. Do it when the soil is slightly moist, not soaked. Wet soil can hide loose joints and makes the bed much heavier to empty.
Walk around the entire bed. Press each board with your hand, check every corner, and look for gaps between the frame and the ground. Use a level across the top edge in both directions. A tape measure can also show whether opposite corners still match.
Signs that need immediate repair
Some damage can wait until the end of the growing season. Other damage can injure plants, waste water, or cause a sudden collapse.
- A board bows more than 1 inch from its original line.
- A corner gap measures more than 1/4 inch.
- A fastener spins without gripping.
- Wood crumbles when pressed with a screwdriver.
- Water remains for more than 24 hours after rain.
- The frame leans toward a walkway, fence, or play area.
- A metal bed has a sharp, curled, or rusted edge.
- Soil touches untreated wood that already shows dark rot.
Test the base and the soil
Place a 2-foot level along each side. Then place it across the bed from corner to corner. If the bed is more than 1 inch out of level over 4 feet, the base may need correction.
Push a narrow garden trowel into the soil near the inside wall. If it stops at a hard layer, you may have compacted soil or a liner that blocks drainage. Dig a small test hole near the lowest corner. Look for standing water, sour smells, gray soil, or pale roots. These signs point to poor drainage rather than a simple frame problem.
💡 Pro Tip: Take photos before emptying the bed. A picture helps you remember which side bowed and where the old braces sat. It also makes it easier to plan a repair before the soil hides the structure again.
Tools and materials for a raised bed repair
You do not need every tool listed below. Select items that match the repair. A drill and exterior screws will handle many loose joints, while a badly rotted bed may need a circular saw and replacement boards.
| Repair task | Tools | Materials |
|---|---|---|
| Tighten joints | Drill, driver bit, level, clamps | Exterior structural screws |
| Replace wood | Pry bar, saw, tape measure, square | Cedar, redwood, or treated lumber |
| Brace long sides | Drill, wrench, level | Threaded rod, washers, nuts, or wood braces |
| Improve drainage | Trowel, shovel, garden fork | Compost, coarse bark, topsoil, gravel-free drain path |
| Reset the base | Shovel, rake, tamper, level | Soil, crushed stone for a path, landscape fabric if needed |
| Repair metal | File, drill, gloves, clamps | Rust-resistant bolts, washers, edge trim |
Use structural exterior screws rather than drywall screws. Screws in the 2 1/2- to 3 1/2-inch range work for many wood joints, but the length must suit the board thickness. For a 2-by-8 board, avoid driving so deep that the screw exits the far side.
The table points to one key rule: choose materials that can handle wet soil and outdoor exposure. Indoor screws, thin wire, and untreated scrap wood often fail within one or two seasons.
Prepare the bed safely
Remove plants before major work if the repair may disturb roots. Mature tomatoes, raspberries, asparagus, and perennial herbs may not survive a full soil removal. If possible, transplant them into pots or a temporary mound made from clean soil.
Wear work gloves, eye protection, and sturdy shoes. Rotten wood can hide nails, and metal beds can have sharp edges. Keep children and pets away while you lift boards or use a saw.
Empty only what you need
For a loose corner, remove soil from the corner and the nearest 12 to 18 inches of each side. For a bowed wall, remove soil until it no longer presses against the board. A long bed may need half its soil removed before the wall will return to its original position.
Do not lift a full raised bed. A 4-by-8-foot bed that is 12 inches deep holds about 32 cubic feet of mix. At roughly 40 to 60 pounds per cubic foot when damp, that load can weigh more than 1,200 pounds.
⚠️ Warning: Never work under a raised bed, lean against a loose wall, or pull a board while soil presses hard against it. Empty the pressure zone first. A board can spring back faster than you expect.
Step-by-step: repair a raised garden bed
The best repair starts with the frame, moves to the base, and ends with the soil. Follow these steps in order, but stop when your inspection shows that the bed is sound.
1. Mark the damaged sections
Use chalk or painter’s tape to mark every loose joint, split, soft spot, and low corner. Measure the board length and thickness before buying replacements. Common board sizes include 2-by-6, 2-by-8, and 2-by-12 lumber, but actual sizes are smaller than the name suggests.
Check the grain and cracks. A narrow surface crack may not matter. A split that runs through a screw hole or reaches the end of the board can weaken the whole side.

2. Remove soil from the repair zone
Scoop soil into clean tubs, a wheelbarrow, or heavy bags. Keep healthy soil separate from soil that smells sour or contains signs of disease. Do not place soil from a bed with tomato blight into another bed where tomatoes, peppers, eggplants, or potatoes will grow.
Set aside any worms and larger roots. Earthworms can return to the bed later. Remove thick mats of perennial weeds, bindweed, quackgrass, and plant roots that may push against the frame.
3. Tighten or replace loose fasteners
Align the corner with a clamp or by pushing the board into place. Drill a small pilot hole, then drive two or three exterior structural screws into each corner. Stagger the screws vertically so they do not split the board along one grain line.
If a screw hole has become too large, move the new screw at least 1 inch away. You can also fill a minor hole with a hardwood dowel and exterior glue, but this is not a cure for rotten wood.
For metal beds, use bolts with wide washers. A washer spreads the load and keeps the bolt head from tearing through thin steel or aluminum.
4. Rebuild weak corners
A simple corner joint often fails because the screw enters end grain. End grain does not hold fasteners as well as the broad face of a board. Add a solid inside block made from cedar or treated lumber, then fasten both side boards to that block.
For a 12-inch-high wood bed, an inside corner block about 3 1/2 inches square and 10 to 12 inches long gives the joint more grip. Use at least four structural screws per corner, with two screws into each side.
If the bed has decorative corner posts, inspect the hidden wood behind them. A post can look sound outside while the soil-facing side has rotted.
5. Straighten a bowed wall
Remove enough soil to release pressure. Place a long straight board or level against the outside of the wall. Use a clamp, ratchet strap, or temporary brace to pull the wall back toward its original line.
Do not force a severely bowed board flat. Old wood may split. If the board has a permanent curve, replace it or accept a small curve and add a brace.
For long beds, install an interior tie brace. A threaded rod can pass through the side walls, with a washer and nut on each end. Place the brace near the middle of a 6- to 8-foot span and 2 to 3 inches below the top edge. Cover exposed hardware with a cap or trim so it does not catch clothing.
6. Replace rotten or split boards
Replace wood when more than one-third of its thickness feels soft, when a split runs through a joint, or when the board flexes under light hand pressure. Do not paint over rot and bury it again. The damage will continue inside the frame.
Cedar and redwood resist decay well, but they cost more. Untreated pine costs less and may last three to seven years, depending on climate and soil contact. Properly rated ground-contact lumber can last longer, but check local rules before using treated wood around food crops.
Cut the new board square. Seal only the cut ends with a product labeled for outdoor wood and safe for the intended use. Keep the board slightly above wet soil when possible.
7. Reset a leaning or sinking bed
If one corner has sunk, remove all or most of the soil before lifting the frame. Dig beneath the low side and remove roots, loose mulch, and soft organic matter. Add firm mineral soil in thin layers, then tamp each layer.
A bed does not need a concrete slab. It does need a stable, level base. On a slope, terrace the bed or use a stepped design rather than forcing a long frame to sit level across uneven ground.
Do not fill the low side with loose compost alone. Compost settles more than mineral soil and may leave the bed crooked again after heavy rain.
8. Fix drainage problems
Raised beds drain well only when water can move through the soil and exit below the bed. A plastic liner, compacted subsoil, or solid weed barrier can trap water.
If the bed sits directly on soil, remove any solid plastic sheet. Use cardboard only as a temporary weed-smothering layer, and make sure it can break down. If the bed sits on concrete, add a drainage gap or large drainage holes along the lowest side. Keep the openings small enough to hold soil.
Do not fill the base with a thick layer of gravel to “improve drainage.” This takes away root space and does not solve a clogged soil profile. A well-mixed growing medium drains better than a perched gravel layer.
9. Refill with healthy soil
Use a mix that supports both drainage and water storage. A practical starting blend is about 60% quality topsoil, 30% finished compost, and 10% aeration material such as pine bark fines. In hot, dry zones, you may use a little more compost or coconut coir. In wet climates, avoid adding too much fine compost.
Fill the bed in 2- to 3-inch layers. Water each layer lightly and let it settle. Do not pack the soil with your feet. Roots need air spaces, and compacted soil can cause stunted carrots, beets, and onions.
For acid-loving crops, test before adding amendments. Most vegetables perform well around pH 6.0 to 7.0. Blueberries prefer about pH 4.5 to 5.5 and usually need a separate bed with acidic soil.
10. Add mulch and monitor the repair
Top the soil with 1 to 2 inches of clean straw, shredded leaves, or fine bark. Keep mulch 2 inches away from wood walls and plant stems. Mulch reduces erosion, moderates soil temperature, and slows evaporation.
Water deeply, then inspect the bed after 24 hours and again after the next strong rain. Look for new gaps, fresh bowing, standing water, or soil leaking through the corners.
🌱 Beginner Note: Soil often drops 1 to 3 inches after a repair because compost and air pockets settle. Wait one to two weeks before adding more mix. Top up with compost and soil, not a deep layer of pure compost.
Choose the right repair for the damage
Not every raised bed needs the same level of work. A small gap may need one brace, while a rotting frame deserves replacement.
| Damage level | Repair | Expected result |
|---|---|---|
| Minor | Tighten screws, fill a small gap, add mulch | Works if wood remains firm |
| Moderate | Add corner blocks, braces, or a tie rod | Restores strength for several seasons |
| Severe | Replace boards, reset base, rebuild corners | Best for structural failure |
| Widespread rot | Replace the entire frame | Safer and often cheaper than repeated repairs |
| Drainage failure | Remove liner, open exits, rebuild soil | Improves root health and reduces rot |
Use a minor repair only when the structure has good wood and a level base. If two or more sides have failed, rebuilding usually saves time and prevents another collapse.
Raised bed materials: what lasts longest
Material affects cost, heat, safety, and repair time. Wood feels natural and is easy to modify. Metal lasts well but can heat up in full sun. Composite boards resist rot but may bow if the frame lacks strong corner hardware.
| Material | Typical service life | Main weakness |
|---|---|---|
| Untreated pine | 3–7 years | Rot near wet soil |
| Cedar | 8–15 years | Higher cost and splitting |
| Redwood | 10–20 years | Cost and regional supply |
| Ground-contact treated wood | 10–20 years | Must follow local safety guidance |
| Corrugated steel | 15–30 years | Heat, sharp edges, rust at cuts |
| Composite boards | 10–25 years | Expansion and bowing |
These ranges vary by USDA zone, rainfall, irrigation, and soil contact. A cedar bed in Arizona may outlast one in coastal Oregon because constant moisture speeds decay.
For food gardens, use products clearly labeled for garden or ground contact. Avoid old salvaged railroad ties, painted boards, and wood with unknown chemical history.
Common mistakes that make the problem worse
Many failed repairs come from trying to save time. The bed may look fine for a month, but the same force remains inside the structure.
Filling a damaged bed before bracing it
Fresh soil adds weight at once. If a wall already bows, filling it can turn a small curve into a split. Always release pressure, straighten the frame, and install braces before refilling.
Using short screws
A 1-inch screw may hold thin trim, but it does little in a thick raised-bed corner. Use a screw long enough to pass through the first board and grip the second without poking out.
Building on loose mulch
Mulch decomposes and shifts. A bed placed on a thick mulch layer may sink after one wet season. Scrape down to firm soil before leveling the frame.
Adding landscape fabric under every bed
Woven fabric can help when invasive grass grows beneath a bed, but it can also slow drainage and trap roots. Use it only when needed, and never use a solid plastic sheet under a soil-filled bed.
Adding too much compost
Compost shrinks as it breaks down. A bed filled with 70% compost may sink quickly and hold too much water. Blend compost with mineral topsoil and coarse organic matter.
Ignoring crop rotation
Soil repair is also a chance to reduce disease. Rotate tomatoes, peppers, eggplants, and potatoes away from the same bed when possible. Follow them with beans, lettuce, carrots, or herbs from another plant family.

My repair routine after two growing seasons
In my own beds, I inspect the frame twice each year. I check them in early spring before planting and again after the hottest part of summer. The spring check catches frost heave and winter rot. The summer check catches irrigation leaks and soil shrinkage.
One cedar bed in a wet Zone 6 garden developed a 3/4-inch bow after four years. I first added more screws, but the curve returned within a month. The real problem was a 10-foot side with no center brace. A threaded rod through the middle solved it, and the wall has stayed straight for two more seasons.
Another bed on clay soil settled at one corner. I added compost under the low side, which was a mistake. It sank again after heavy rain. I eventually emptied the bed, removed soft clay, added firm mineral soil in layers, and reset the frame. That repair lasted because I fixed the base instead of hiding the symptom.
A simple maintenance schedule
Regular checks prevent small defects from becoming expensive repairs. You do not need to inspect the bed every week, but you should watch it during major weather changes.
| Time | Task | What to look for |
|---|---|---|
| Early spring | Check level, corners, and drainage | Frost heave, gaps, wet soil |
| After heavy rain | Inspect walls and soil surface | Leaks, pooling, erosion |
| Midseason | Check irrigation and braces | Loose hardware, wet boards |
| Late fall | Remove diseased plants and debris | Rot, pests, hidden cracks |
| Every 2–3 years | Test pH and organic matter | Nutrient imbalance, soil settling |
Keep mulch shallow near the walls and direct downspouts away from the bed. A gutter outlet that dumps beside one corner can damage wood faster than normal rainfall.
How to prevent another raised bed failure
A sound design reduces stress from the start. Keep most beds 3 to 4 feet wide so you can reach the center without stepping on the soil. Long beds need braces or tie rods, especially when they are 12 inches or taller.
Use at least two fasteners at each corner. Place them at different heights and avoid driving into existing cracks. Pre-drill near board ends. This small step reduces splitting in cedar and redwood.
Keep the outside of the bed visible. Do not pile leaves, mulch, or soil against the outer boards. Good air flow helps wood dry after rain.
Improve the site
Choose a location with six to eight hours of sun for crops such as tomatoes, cucumbers, peppers, squash, and beans. Leafy greens can handle less sun, especially in USDA Zones 7 through 10 where afternoon heat can cause lettuce and spinach to bolt.
Avoid low spots. If the site stays wet, raise the surrounding path or install a shallow swale to move water away. Do not place a bed where a roof downspout discharges.
Protect the soil
Use compost made from known ingredients. Add finished compost once or twice each year rather than dumping a thick layer at once. Use organic fertilizer based on a soil test, not guesswork. A general vegetable fertilizer near a 5-5-5 NPK ratio can work for many beds, but crops and soil tests vary.
Rotate plant families. Follow Solanaceae crops such as tomatoes and peppers with beans, peas, lettuce, or carrots. Add flowers such as calendula, alyssum, and borage to attract pollinators and beneficial insects, but remove aggressive self-seeders before they take over.
When to repair, rebuild, or replace the bed
Repair the bed when the frame is mostly sound and the failure has a clear cause. Rebuild when the corners, sides, and base have several problems. Replace the bed if the material has widespread rot, sharp metal failure, or unsafe chemical contamination.
| Situation | Best choice | Reason |
|---|---|---|
| One loose corner | DIY repair | Low cost and little soil removal |
| One bowed side | Add brace or replace board | Keeps the rest of the frame |
| Two rotten boards | Partial rebuild | Saves sound sections |
| Rot on most sides | Full replacement | Repeated repairs cost more |
| Unknown treated or painted wood | Replace | Food garden safety is uncertain |
| Bed on a bad slope | Reset or relocate | Frame repairs will not stop sinking |
A typical DIY repair may cost $20 to $80 for screws, braces, and soil. Replacing a full 4-by-8-foot frame may cost $150 to $500, depending on wood or metal. Labor raises the price, but the hardest part remains removing and replacing the soil.
Do not hire a contractor for a loose screw or small gap. Get help when the bed forms a retaining wall, sits above a drop, supports a greenhouse, or needs major excavation. A tall bed filled with wet soil can create serious pressure.
When a raised bed is not the right choice
A raised bed may not solve poor soil if the site stays flooded, has contaminated fill, or lacks enough sun. In those cases, containers, grow bags, a mounded row, or a different part of the yard may work better.
Grow bags are inexpensive and drain well, but they dry out faster. In-ground beds cost less to build and give roots more room, but they offer less control over clay, weeds, and soil contamination. A metal trough can last longer than pine but may need insulation in hot climates.
The best option depends on your goal. Choose a raised bed for access, soil control, and early spring warming. Choose in-ground planting for large crops such as pumpkins, corn, and fruit trees.
Frequently asked questions
Q: Can I fix a raised garden bed without removing all the soil?
A: Yes, if the damage affects one corner or a small section. Remove soil from the damaged area until the wall can move freely. A bowed long side, rotten base, or leaning frame usually needs much more soil removed.
Q: Why is my raised garden bed bowing outward?
A: Wet soil is pushing against a weak or unsupported wall. Long beds, thin boards, poor screws, and frozen soil make bowing worse. Remove soil pressure, straighten the wall, and add a center brace or threaded tie rod.
Q: How do I repair a raised bed corner?
A: Empty the corner, realign the boards, and attach an inside corner block with exterior structural screws. Use two or more screws per board and pre-drill near the ends. Replace the wood if it feels soft or splits around the fasteners.
Q: Should I use gravel at the bottom of a raised bed?
A: Usually no. A deep gravel layer takes away growing space and may create a perched water layer above it. Improve drainage with a loose soil mix and a clear exit below the bed.
Q: How often should I replace soil in a raised bed?
A: You usually do not need to replace all the soil. Add 1 to 2 inches of finished compost or a soil blend each year, test pH every two to three years, and remove diseased plant debris. Replace soil only when it contains persistent disease, contamination, or severe compaction.
Q: Is pressure-treated wood safe for a vegetable garden?
A: Modern ground-contact treated lumber is regulated, but products and local guidance vary. Use wood labeled for the intended outdoor use, follow the product directions, and avoid old salvaged lumber with unknown treatment. Cedar, redwood, and composite boards are alternatives.
Q: How long does a raised garden bed last?
A: Untreated pine may last three to seven years, while cedar often lasts eight to fifteen years. Metal and composite beds can last longer. Moisture, soil contact, irrigation, and local climate matter more than the label alone.
Q: Can I repair a raised bed in winter?
A: Small hardware repairs can wait for a dry day in winter. Major soil work is easier in spring or fall when plants are dormant and the ground is workable. Avoid digging wet clay because it can create lasting compaction.
Q: What should I do if water pools in my raised bed?
A: Check for compacted soil, a solid liner, blocked drainage holes, or a low site. Dig a small test hole and inspect the soil below. Remove plastic, loosen compacted layers, and create a safe drainage path away from the frame.
Q: How much soil does a raised bed need?
A: A 4-by-8-foot bed that is 12 inches deep needs 32 cubic feet of mix, or about 1.2 cubic yards. Buy a little extra because soil settles after watering. For a 6-inch bed, use half that volume.
Q: Can I put a raised bed on concrete?
A: Yes, but drainage and root depth need special care. Use a bed at least 12 inches deep, add several low drainage openings, and protect the surface from staining. Crops with deep roots may perform better in a deeper bed or large container.
Q: Should I line a wooden raised bed?
A: A breathable liner can reduce soil contact, but it may also hold moisture against the wood. Never use solid plastic as a full bottom liner unless the design includes a safe drainage system. Good soil, a level base, and airflow often protect wood better.
A raised garden bed is worth repairing when the frame still has strong material and the failure has a clear cause. Start by removing pressure, then fix the structure, correct the base, and restore the soil. The repair will last far longer if you also solve the drainage, moisture, and fastener problems that caused the damage.
For a small gap, begin with a corner block and exterior screws. For a long bowed wall, use a brace or threaded rod. For widespread rot or unsafe lumber, replace the frame rather than spending another season on temporary fixes. With a level base, good soil, and two yearly inspections, most raised beds can stay productive for many seasons.
Meta description: Learn how to fix a raised garden bed, including bowed walls, loose corners, rotten wood, poor drainage, sinking soil, safe materials, and lasting repairs.