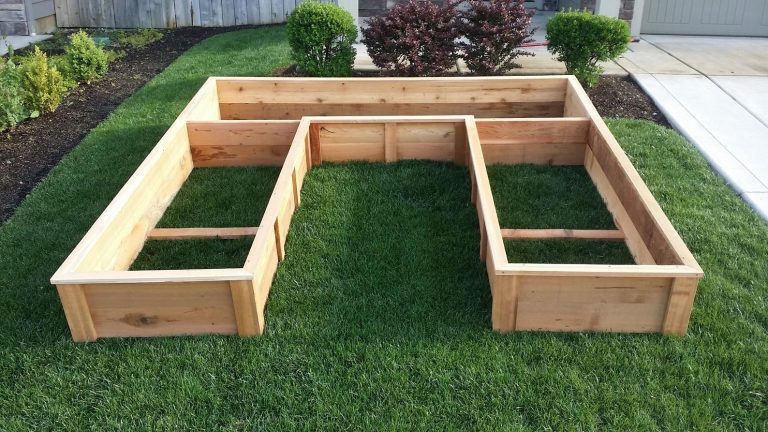
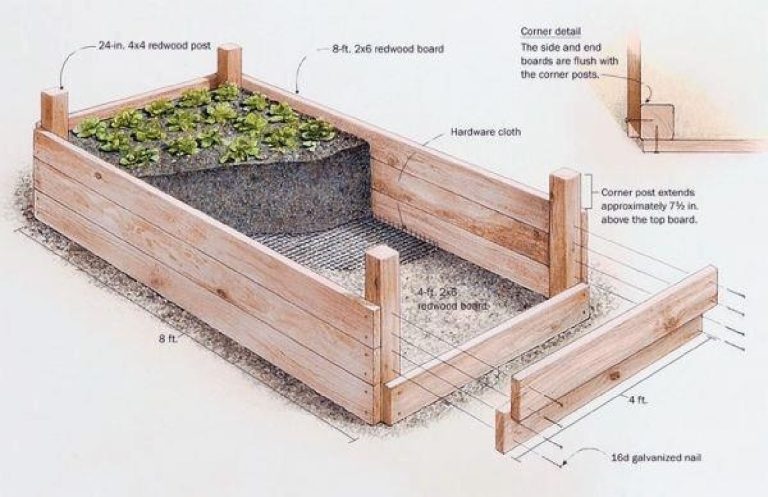
How To Build An Elevated Raised Garden Bed: Easy Guide
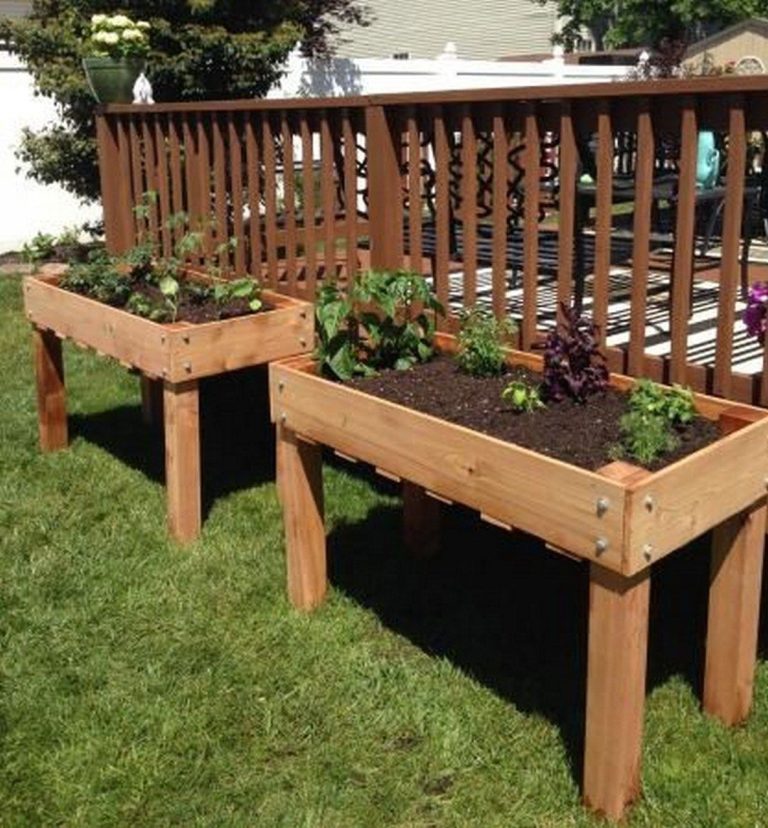
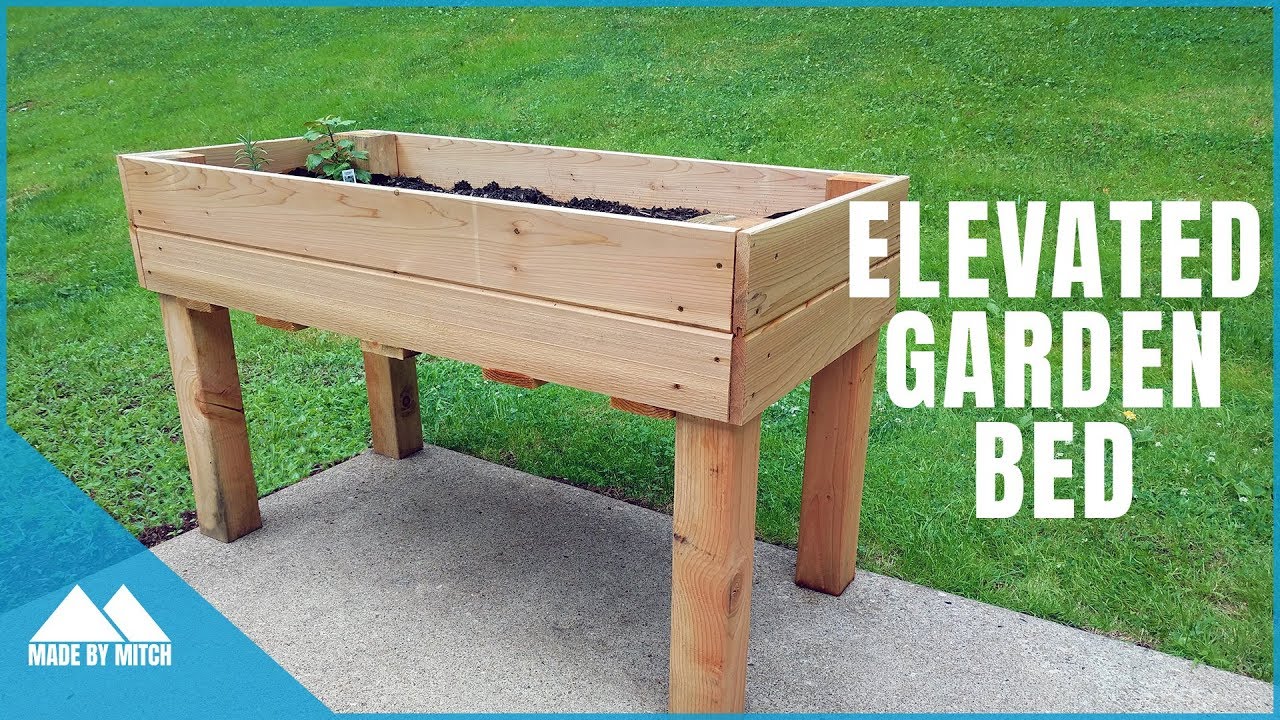
An elevated raised garden bed brings the soil up to a comfortable working height. Unlike a raised bed that sits on the ground, an elevated bed stands on legs or a sturdy frame. You can grow lettuce, herbs, strawberries, flowers, and compact vegetables without kneeling or bending for long periods.
I have built and used elevated beds in wet Pacific Northwest gardens, dry beds in USDA Zone 6, and hot summer gardens in Zone 8. The frame matters, but drainage, soil weight, and safe height matter just as much. A well-built bed can last 7 to 15 years, while a weak frame may bow or fail after one wet season.
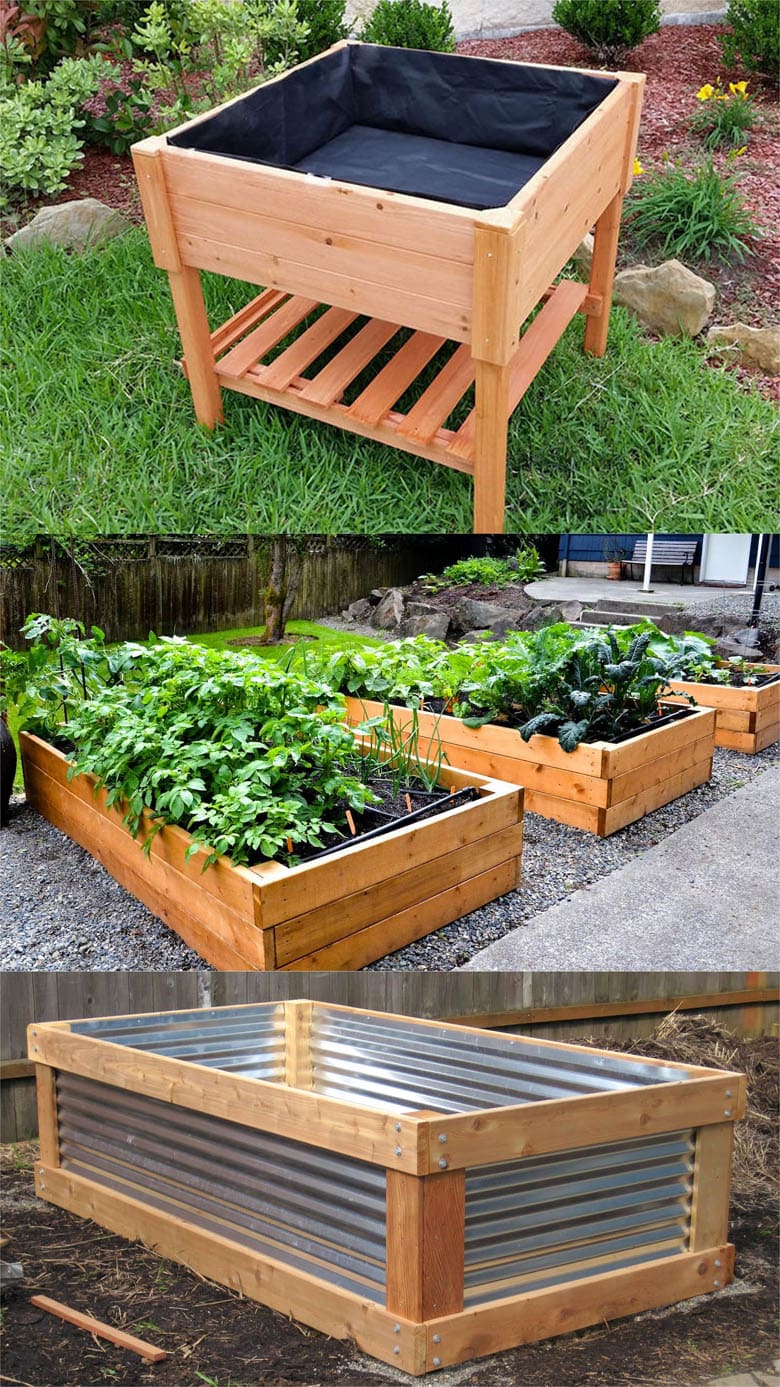
Quick answer: Build the frame first, then fill it with light soil
To build an elevated raised garden bed, make a strong box from cedar, redwood, or exterior-rated lumber. Attach it to four stable legs, add cross-braces, drill drainage holes, and fill it with a light soil mix. A good starting size is 2 feet wide, 4 to 6 feet long, and 30 to 36 inches tall.

The bed should sit on firm, level ground. Keep the soil depth at least 10 to 12 inches for herbs and leafy greens. Use 16 to 24 inches for tomatoes, carrots, peppers, and larger root crops.
The most important detail is weight. Wet soil can weigh more than 60 pounds per cubic foot. A 2-by-6-foot bed with 12 inches of soil may hold more than 1,000 pounds once watered. Build for that load, not for the empty box.
What makes an elevated raised bed different?
An elevated raised bed is a planting box lifted off the ground by legs, a platform, or a raised frame. It gives you control over the soil and keeps plants above compacted ground, weeds, and some crawling pests.

A tabletop bed usually has a work surface from 28 to 36 inches high. A wheelchair-friendly bed often has open knee space below and a height of 30 to 34 inches. A tall bed for someone who wants to stand while gardening may reach 36 to 42 inches, but it needs wider legs and stronger bracing.
The bed does not connect to native soil. That makes it different from a standard raised bed. It also means you must manage water, nutrients, and soil temperature more closely.
How an elevated bed works
The plants grow in a contained soil mix above the ground. Drainage holes let extra water leave the box, while the frame carries the weight of the soil, plants, and water.

Because the bed has a limited soil volume, it warms faster in spring and dries faster in summer. This helps early crops, but it can stress tomatoes, cucumbers, and peppers during hot weather. A 2-inch layer of straw or leaf mulch helps slow water loss.
An elevated bed also blocks access for earthworms and many soil microbes. Add finished compost each season to keep the soil active. Avoid using only compost, since it can settle, dry out, or release too many nutrients.
Who benefits most from one?
An elevated raised garden bed suits gardeners with limited mobility, back pain, small patios, poor native soil, or heavy clay. It also works well for renters who want a movable food garden.

This setup helps people who cannot kneel or safely work at ground level. It can also keep pets from digging in tender seedlings. In my garden, an elevated bed became the easiest place to grow salad greens because rabbits could not reach the leaves.
It may not suit large crops such as pumpkins, corn, indeterminate tomatoes, or sprawling winter squash. Those plants need more root space and support than a small elevated box can provide.
Choose the right size, height, and location
The best elevated bed size depends on your reach, the crops you want, and the strength of the frame. Keep the width narrow enough that you can reach the center without leaning over the soil.
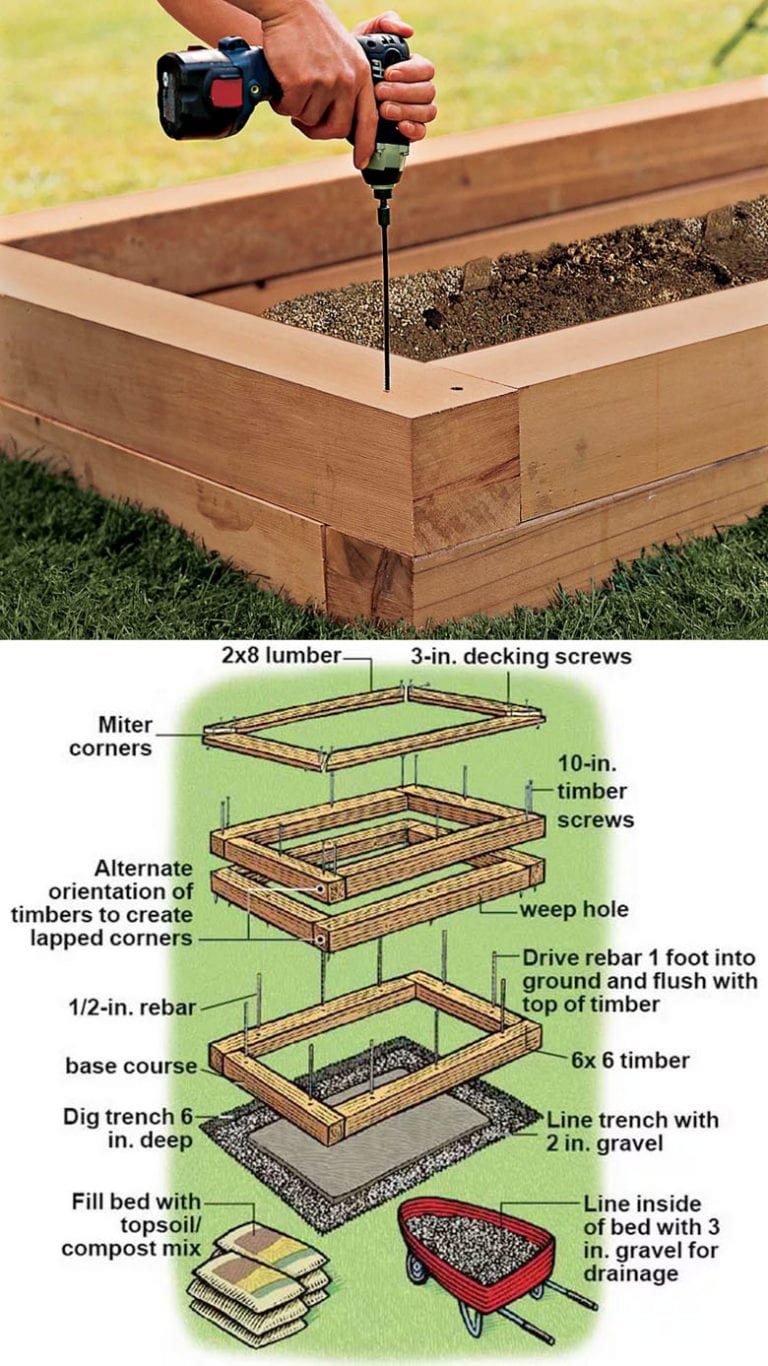
For most people, 2 feet wide works well when the bed is against a wall. A freestanding bed can be 3 to 4 feet wide if you can reach both sides. I prefer 2 feet for a single-sided bed and 3 feet for a bed that I can walk around.
The ideal height is personal. Measure from the floor to the height where your hands rest when you work. Then allow space for the soil box. A 30-inch bed feels comfortable for many seated gardeners, while a 36-inch bed works better for standing tasks.
| Bed feature | Practical starting point | Why it matters |
|---|---|---|
| Width | 24–36 inches | Keeps all plants within reach |
| Soil depth | 10–24 inches | Supports crops with different root needs |
| Working height | 28–36 inches | Reduces bending and kneeling |
| Length | 4–8 feet | Fits most patios and yards |
| Leg spacing | 24–48 inches | Helps prevent sway and bending |
A narrow bed is easier to reach and less likely to bow. A longer bed needs center supports, especially when it holds more than 12 inches of soil.
Find the best amount of sun
Place the bed where it receives at least 6 to 8 hours of direct sun for tomatoes, peppers, beans, and strawberries. Leaf lettuce, spinach, cilantro, and parsley can manage with 4 to 6 hours, especially in hot climates.

Watch the sun for a full day before you build. A spot that looks sunny at 10 a.m. may sit in shade by 2 p.m. Nearby fences, walls, trees, and roof lines can also block winter light.
In USDA Zones 7 through 10, some afternoon shade helps cool leafy greens. In Zones 3 through 6, full sun helps the soil warm sooner. Do not place the bed under a tree unless you accept falling leaves, root competition, and extra shade.
Check the surface and drainage path
Set the legs on concrete pavers, compacted gravel, or another firm surface. Avoid soft lawn soil that can settle unevenly under the load.

Use a 2-foot level to check the frame from side to side. A small slope can cause water to pool at one end. That leads to wet roots, uneven growth, and extra stress on the lower joints.
Make sure water can drain away from walls and doorways. A leaking bed can stain siding, damage a deck, or create a slippery surface.
⚠️ Warning: Do not place a heavy soil-filled bed on a balcony, rooftop, or deck without checking the load rating first. The weight may exceed what the structure can safely hold.
Gather the tools and materials
Use rot-resistant wood, exterior screws, and hardware that can handle constant moisture. Galvanized or stainless steel fasteners cost more than plain screws, but they resist rust and hold better over time.

For a basic 2-by-6-foot bed with a 12-inch soil box, you need four side boards, corner posts, legs, braces, a bottom, and drainage parts. Adjust the list if you change the size.
| Material or tool | Suggested choice | Use |
|---|---|---|
| Side boards | Cedar, redwood, or treated lumber | Forms the soil box |
| Legs | 4-by-4 posts or doubled 2-by-4s | Carries the load |
| Fasteners | 3-inch exterior screws | Joins the frame |
| Bottom | 5/4 deck boards or exterior plywood | Holds soil above the ground |
| Drill | Cordless drill with bit set | Drills holes and drives screws |
| Saw | Circular saw or miter saw | Cuts boards and braces |
| Level | 2-foot or 4-foot level | Checks the frame |
| Safety gear | Eye protection, gloves, hearing protection | Reduces injury risk |
A circular saw works well for most cuts. A miter saw speeds up repeated cuts but is not essential. I have built beds with a basic cordless drill and circular saw; careful measuring matters more than premium tools.
Avoid old painted boards, railroad ties, and unknown salvaged lumber. They may contain lead, creosote, or other chemicals. Modern pressure-treated lumber made for outdoor use is generally used in garden structures, but check local guidance if you plan to grow food.
Select safe wood and hardware
Cedar and redwood resist decay without added preservatives. They cost more, but they are a good choice for organic food gardens. Douglas fir costs less and can last several years if sealed and kept off wet ground.

Use untreated cedar for the inside of the box when your budget allows. If you use pressure-treated lumber, buy current outdoor-rated boards from a reputable supplier and do not cut or burn scraps indoors.
Use deck screws, not drywall screws. Drywall screws snap under movement and rust quickly. For large beds, add carriage bolts or structural screws at the leg joints.
Plan the soil volume before you shop
Calculate soil volume with this formula:
Length × width × soil depth = cubic feet
For example, a 6-foot by 2-foot bed with 1 foot of soil needs 12 cubic feet of mix. Add about 10 percent for settling.
| Bed size | Soil depth | Approximate soil needed |
|---|---|---|
| 2 × 4 feet | 12 inches | 8.8 cubic feet with settling |
| 2 × 6 feet | 12 inches | 13.2 cubic feet with settling |
| 3 × 6 feet | 18 inches | 29.7 cubic feet with settling |
Bagged soil often comes in 1- or 2-cubic-foot bags. Bulk soil is cheaper for large projects, but a pickup or delivery may be needed. Never fill the bed with topsoil alone. It becomes heavy and may compact badly.
Build an elevated raised garden bed step by step
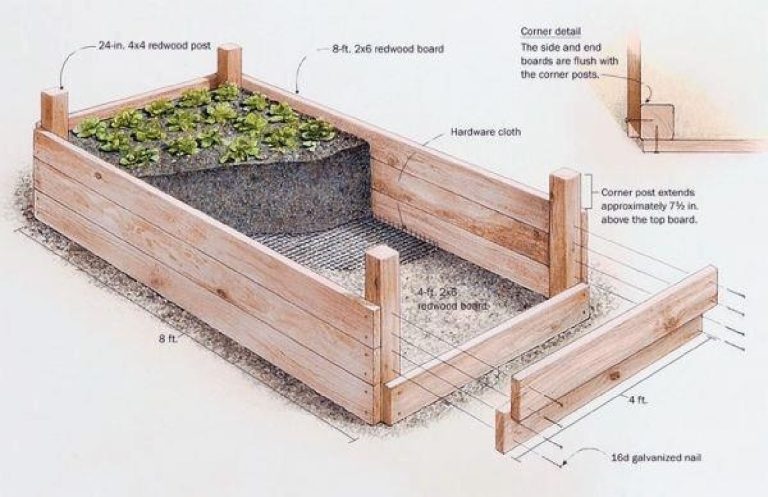
A strong build starts with a square box and stable legs. Work on a flat surface, pre-drill near board ends, and check each corner before adding more screws.

The steps below describe a 2-by-6-foot bed with a 12-inch soil box and a working height near 30 inches. You can change the height, but keep the same basic structure.
1. Cut the frame parts
Cut two long side boards at 72 inches and two end boards at 24 inches. If your boards are 1½ inches thick, the end boards fit between the long boards for an outside width of 24 inches.

Cut four legs to your chosen working height. For a 30-inch frame, use 4-by-4 posts cut to 28 to 30 inches, depending on the thickness of the bottom and top boards.
Cut two long lower braces and two short end braces. These braces join the legs and stop the bed from swaying. For a 6-foot bed, add a center support under the bottom.
Mark every cut with a square. A crooked cut can make the box twist. Wear eye protection when cutting, and keep hands well away from the blade path.
2. Assemble the soil box
Place the long boards and end boards on a flat surface. Clamp or hold each corner square, then drive two or three exterior screws through each long board into the end board.
Measure from corner to corner in both directions. The two diagonal measurements should match. If one diagonal is longer, push the frame until both numbers match before tightening the screws.
For extra strength, add a second screw near each corner. Do not place screws too close to the board edge, or the wood may split. Pre-drill holes in cedar and other soft boards.
3. Attach the legs
Turn the box upside down and place one leg inside each corner. Keep the legs flush with the top edge or set them slightly below it.

Use at least four screws per leg, driven through the side boards into the post. For a bed longer than 6 feet, add a center pair of legs or a full support frame below the box.
The legs carry nearly all the weight. Do not rely on one small screw at each corner. If the bed feels loose now, it will feel much worse after you add wet soil.
4. Add lower braces and a center support
Attach long braces between the front and back legs. Place them 4 to 8 inches above the ground. Add short braces between the end legs.
Braces stop the legs from spreading and reduce side-to-side movement. On a 6-foot bed, add a center beam below the bottom boards. Support that beam with a center leg or a pair of blocks.
I once skipped the center support on a 2-by-8-foot bed. The base sagged after one rainy winter, and the drain holes clogged at the low point. Adding one beam would have taken 10 minutes and saved a full rebuild.
5. Install the bottom
Use deck boards, exterior plywood, or several narrow boards with small gaps. Deck boards drain well and allow air to move below the soil.
If you use plywood, choose exterior-rated material at least ¾ inch thick. Support its edges and center with framing. Thin indoor plywood will swell and fail after repeated watering.
Leave small gaps between deck boards. A gap of about ⅛ to ¼ inch allows water to escape without letting much soil fall through. Cover wide gaps with hardware cloth or landscape fabric.
6. Drill drainage holes
Drill ½- to 1-inch holes every 8 to 12 inches across the bottom. Add extra holes near the corners and center.
Do not line the bottom with solid plastic. Plastic traps water and can turn the bed into a shallow pond. If you need to hold soil in place, use breathable landscape fabric or ¼-inch hardware cloth.
A small amount of soil may wash out during the first few waterings. That is normal. If the loss continues, place a thin layer of fabric over the bottom.
7. Sand, seal, and inspect the frame
Sand sharp corners and rough splinters with 80- to 120-grit sandpaper. Pay special attention to the top edge, where your arms may rest.
You can leave cedar unfinished, or coat the outside with a garden-safe exterior oil. Do not coat the inside with unknown products. If you paint the frame, use a product rated for exterior wood and let it cure fully before adding soil.
Check every screw, brace, and leg. Push the frame from each side. It should feel firm, with no rocking or twisting.
🔧 Quick Fix: If the frame rocks on a hard surface, do not hide the problem with extra soil. Add a paver or a rot-resistant shim beneath the low leg, then recheck the level.
8. Add a trellis only after checking balance
A trellis helps peas, beans, cucumbers, and small melons grow upward. Attach it to the frame or anchor it separately in the ground.
Do not add a tall trellis to a narrow bed without widening the base. Wind can turn the trellis into a lever and tip the whole bed. A 6-foot trellis on a 2-foot-wide bed needs strong bracing.
For tomatoes, use a separate cage or stake. Indeterminate varieties such as ‘Sungold’ and ‘Cherokee Purple’ become heavy and can pull a light frame sideways.
Fill the bed with the right soil mix
The best soil for an elevated raised bed is light, fertile, well-drained, and able to hold moisture. A common mix uses 50 percent quality topsoil, 30 percent finished compost, and 20 percent perlite, pumice, or coconut coir.
For a shallow bed, use a commercial raised-bed mix. For a deep bed, buying all bagged mix can become expensive. Mix clean bulk topsoil with compost and a light mineral ingredient to reduce weight and improve drainage.
Do not use garden soil straight from the yard. It often contains weed seeds, clay clumps, and pests. It also becomes too heavy for an elevated frame.
Match soil depth to the crop
Most leafy greens need only 6 to 8 inches of root space. Herbs such as thyme, oregano, and chives can grow in 8 to 10 inches. Tomatoes, peppers, carrots, and beets perform better with 12 to 18 inches.
Strawberries can grow in 8 to 12 inches, but they need good drainage and steady water. Bush beans need about 12 inches. Cucumbers need more space and may dry out quickly in a small bed.
Carrots require loose soil with no stones or fresh manure. Choose short varieties such as ‘Paris Market’ or ‘Little Finger’ if your bed is less than 12 inches deep.
Test pH and nutrients
Most vegetables prefer a soil pH between 6.0 and 7.0. A basic soil test can show pH, phosphorus, potassium, and organic matter.
Do not add lime just because a garden book suggests it. Lime raises pH, and too much can lock up nutrients. Add amendments based on the test and crop needs.
After four weeks, check plant color and growth. Pale lower leaves may point to low nitrogen, while purple leaves can result from cold roots or phosphorus stress. Do not diagnose from leaf color alone; temperature, water, and root damage can look similar.
| Soil ingredient | Main role | Typical amount |
|---|---|---|
| Topsoil | Adds mineral soil and structure | 40–50% |
| Finished compost | Adds organic matter and mild nutrients | 25–35% |
| Coir, perlite, or pumice | Improves air space and drainage | 15–25% |
| Aged bark fines | Adds structure in some mixes | Up to 10% |
Use finished compost that smells earthy and looks dark. Fresh manure can burn roots and may carry pathogens. Avoid compost made from unknown industrial waste.
🌱 Beginner Note: The mix may settle 2 to 4 inches during the first season. Top it up with compost and raised-bed mix rather than adding a thick layer of plain topsoil.
Plant the bed for easy care
Planting in an elevated bed works best when you group crops by water and sun needs. Put thirsty crops near the water source and drought-tolerant herbs near the edge.
A simple 2-by-6-foot layout might include lettuce, radishes, basil, parsley, and two compact pepper plants. Use the center for taller plants and the edges for trailing herbs or strawberries.
Do not crowd plants because the bed looks empty at first. Good airflow reduces powdery mildew, downy mildew, and gray mold.
Good crops for elevated beds
The easiest crops include salad greens, kale, Swiss chard, radishes, bush beans, scallions, basil, parsley, thyme, and strawberries. These plants give fast results and do not need deep roots.
For spring, plant spinach, lettuce, peas, radishes, and kale. In warm weather, grow basil, beans, peppers, and compact tomatoes. In fall, sow arugula, mizuna, cilantro, and baby carrots.
Choose compact varieties when space is limited. ‘Patio Choice Yellow’ tomato, ‘Fairy Tale’ eggplant, and bush cucumber types fit better than large vining cultivars.
Use companion planting with realistic expectations
Companion planting can help you use space and attract beneficial insects, but it does not replace pest control. Pair basil with tomatoes, dill with cucumbers, and alyssum with many vegetables to attract hoverflies and other pollinators.
Avoid planting mint directly in the bed. Mint spreads fast and can crowd other roots. Grow it in a separate container, even when the container sits near the bed.
Rotate plant families when possible. Do not grow tomatoes, peppers, eggplants, or potatoes in the same soil year after year. These crops share diseases such as early blight and can deplete nutrients.
Water and fertilize an elevated bed
Elevated beds often need more frequent watering than ground-level beds. The soil volume is small, the sides heat up, and air moves below the box.
Check moisture by pushing a finger 2 inches into the soil. Water when the upper layer feels dry but the root zone still has slight moisture. During a heat wave, a 2-foot-wide bed may need water each morning, and tomatoes may need a second check in the evening.
Drip irrigation or a soaker hose works better than a sprinkler. It keeps leaves dry and sends water to the root zone. Add a timer, but still check the soil because timers cannot see rain, wind, or heat.
| Season or condition | Watering approach | Fertilizer approach |
|---|---|---|
| Cool spring | Check every 2–3 days | Add compost before planting |
| Warm summer | Check daily | Feed heavy crops every 3–4 weeks |
| Heat wave | Check morning and evening | Avoid strong feeding during wilt |
| Fall | Reduce as growth slows | Add compost after harvest |
| Winter | Water only when soil is dry and unfrozen | Do not fertilize dormant crops |
Use a balanced organic fertilizer near planting time, such as a product close to 5-5-5 NPK. Heavy feeders may need extra nitrogen, but too much nitrogen creates soft leaves and fewer tomatoes.
Mulch the surface
Add 1 to 2 inches of shredded leaves, straw, or fine bark around plants. Keep mulch 1 inch away from stems to reduce rot and slug cover.
Mulch keeps the surface cool and slows evaporation. In my Zone 6 beds, a light straw layer reduced summer watering by about one-third. In wet climates, use less mulch so the surface can dry between waterings.
Watch for slugs under damp mulch. Hand-pick them at dusk, remove hiding places, and avoid creating a thick wet layer around lettuce.
Protect plants from pests and weather
An elevated bed blocks some rabbits and pets, but it does not stop aphids, cabbage worms, whiteflies, spider mites, or birds. Inspect leaves twice a week.
Look under leaves for eggs and small larvae. Remove cabbage worms by hand or cover kale and broccoli with insect netting. Use row cover early in the season, but remove it when squash, beans, or cucumbers need pollinators.
Strong wind can dry the bed and loosen a trellis. Place the long side of the bed across the main wind direction when possible. Anchor the legs or add diagonal braces in exposed yards.
In USDA Zones 3 through 6, use frost cloth for spring and fall freezes. In Zones 8 through 10, use shade cloth during extreme heat, especially for lettuce and cilantro.
| Symptom | Likely cause | First fix |
|---|---|---|
| Soil stays wet for days | Blocked or weak drainage | Clear holes and check the bottom |
| Plants wilt each afternoon | Heat or low soil moisture | Add mulch and check roots |
| Yellow lower leaves | Overwatering or low nitrogen | Check moisture before feeding |
| White powder on leaves | Powdery mildew | Improve airflow and remove leaves |
| Chewed leaf edges | Slugs, caterpillars, or beetles | Inspect at dusk and cover plants |
| Frame leans | Settled leg or weak brace | Level the legs and add bracing |
Do not spray broad-spectrum insecticide as a first step. It can kill bees, hoverflies, ladybugs, and other helpful insects. Identify the pest before you treat it.
Maintain the frame and soil over time
An elevated garden bed needs a quick inspection each season. Look for cracked wood, loose screws, rust, sagging boards, and blocked drain holes.
Check the frame in early spring before filling it with new crops. Press against each side and inspect the leg joints. Tighten screws before the wood moves too far.
Wood often fails first at the bottom edges and around drainage holes. These areas stay wet after watering. Keep the bed level and make sure air can move beneath it.
| Maintenance task | How often | What to check |
|---|---|---|
| Inspect screws and braces | Each spring and fall | Loose joints or movement |
| Check drainage holes | Monthly in wet seasons | Soil, roots, or debris |
| Add compost | Once each season | Settling and low organic matter |
| Inspect wood | Every 6 months | Rot, cracks, and soft spots |
| Wash irrigation lines | At season end | Algae, clogs, and leaks |
| Empty or cover in winter | Before hard freezes | Waterlogged soil and frost damage |
A cedar bed may last 8 to 15 years with good drainage. Fir may last 4 to 8 years, depending on climate and ground contact. Plastic composite beds resist rot but can become brittle in strong sun and may cost more.
Repair common problems
If a side board bows outward, remove some soil before repairing it. Add an internal brace, a structural screw, or an exterior tie that connects the two sides.
If a leg rots, do not simply screw a new board over the damaged area. Empty the bed enough to reduce weight, support the box with temporary blocks, and replace the leg or add a properly sized support post.
If water leaks from one corner, inspect the bottom and the joint. A small gap is harmless if the bed drains. A large gap needs hardware cloth and landscape fabric to hold the mix.
Personal lessons from building and using these beds
My first elevated bed was too narrow for the amount of soil it held. The box was only 18 inches wide, but it stood 36 inches high. It looked neat, yet the narrow base made it sway whenever I watered or brushed past it.
Adding diagonal braces fixed most of the movement. A wider 24-inch base would have worked even better. Since then, I build the base first and test it before adding the soil box.
I also used too much compost in one early mix. Plants grew fast, but the soil dried into a crust and the tomato leaves curled during hot afternoons. A mix with more mineral soil, coir, and mulch gave steadier moisture over the next two seasons.
Another surprise was winter moisture. The bed handled summer well, but the bottom stayed saturated during a long wet spring. Adding more drainage holes and raising the legs on pavers solved the problem.
Cost, time, and alternatives
A small DIY elevated bed can cost about $150 to $350, depending on wood, soil, hardware, and irrigation. Cedar and bagged soil push the price up. A larger bed or custom wheelchair-accessible design can cost $400 to $900.
Plan 4 to 8 hours for a first build, including cutting, assembly, leveling, and filling. An experienced builder may finish the frame in one afternoon, but soil delivery and planting add more time.
Current pricing ranges from low-cost plastic kits to several-hundred-dollar cedar systems. The cheapest option is not always the best value if the legs are thin or the bottom cannot support wet soil.
| Option | Typical cost range | Best fit |
|---|---|---|
| DIY cedar bed | $150–$350 | Gardeners with basic tools |
| Store-bought wood kit | $200–$600 | People who want simpler assembly |
| Composite or metal bed | $250–$900 | Long life and low rot risk |
| Masonry or block bed | $300–$1,000+ | Permanent accessible gardens |
| Large tabletop system | $500–$1,500+ | Wheelchair access or high capacity |
A standard ground-level raised bed costs less and holds more soil. Choose it if bending is not a concern and you want larger crops. Grow bags cost less and work well for tomatoes and potatoes, but they dry faster and sit lower.
A vertical planter saves floor space but has even less soil volume. It suits herbs and strawberries, not deep-rooted vegetables. A tabletop bed is the strongest alternative for seated gardening, especially when it includes open space for knees.
Common mistakes to avoid
Most elevated bed failures come from underbuilt frames, poor drainage, or the wrong soil. Fixing these issues after planting is harder than building them correctly at the start.
Avoid these mistakes:
- Making the bed too wide to reach the center.
- Using drywall screws instead of exterior fasteners.
- Skipping lower braces.
- Filling the box with heavy clay soil.
- Drilling too few drainage holes.
- Placing the bed on soft or uneven ground.
- Planting large crops in a shallow box.
- Adding a tall trellis without anchoring the base.
- Overwatering because the top looks dry.
- Using fresh manure or unfinished compost.
- Crowding plants to fill empty space.
- Ignoring wood rot at the bottom of the legs.
Do not use gravel as a thick drainage layer inside the bed. It takes up valuable root space and does not fix a poorly designed bottom. The best drainage solution is a well-supported bottom with enough open holes.
When to hire a professional
Hire a professional or ask for structural advice when the bed will sit on a roof, balcony, deck, retaining wall, or other elevated structure. A soil-filled bed can create a serious load problem.
Get help if you need a wheelchair-accessible design with transfer space, custom knee clearance, or a large permanent frame. The correct height and reach depend on the user, chair, and site.
You can usually handle cutting, assembly, soil mixing, and planting yourself on a ground-level site. Ask for help lifting soil bags and positioning long boards. Back injuries can turn a simple weekend project into a long recovery.
FAQs about elevated raised garden beds
How high should an elevated raised garden bed be?
A height of 28 to 36 inches suits many gardeners. Choose 30 to 34 inches for seated work and 34 to 36 inches for standing work. Measure your reach before cutting the legs.
How deep should an elevated garden bed be?
Use 10 to 12 inches for lettuce, herbs, and radishes. Use 12 to 18 inches for peppers, tomatoes, carrots, beets, and strawberries. Deeper soil gives more room for roots but adds major weight.
Can I put an elevated raised bed on grass?
Yes, but use pavers or compacted gravel beneath the legs. Do not place a heavy bed directly on soft grass. The legs may sink at different rates and twist the frame.
What is the best soil mix for an elevated bed?
Use about 50 percent quality topsoil, 25 to 35 percent finished compost, and 15 to 25 percent perlite, pumice, or coconut coir. Adjust the mix for your climate and crop needs.
Do elevated garden beds need drainage holes?
Yes. Drill ½- to 1-inch holes every 8 to 12 inches across the bottom. Without drainage, roots may rot and the frame may hold excessive water weight.
Can I grow tomatoes in an elevated raised bed?
Yes, but choose compact or determinate varieties and provide at least 12 to 18 inches of soil. Support the plants with a cage or stake. Large indeterminate tomatoes may overwhelm a small bed.
How often should I water an elevated garden bed?
Check the soil every day during hot weather. Water when the top 2 inches feel dry. Most beds need water every 1 to 3 days in summer, but weather, soil, crop size, and USDA zone change the schedule.
How long does an elevated raised bed last?
Cedar may last 8 to 15 years, while untreated fir may last 4 to 8 years. Good drainage, covered legs, strong hardware, and regular inspections can extend the life.
Can I leave an elevated garden bed outside in winter?
Yes, if the frame is sound and the bed drains well. Remove dead plants, clean irrigation lines, and protect the soil with compost or mulch. In very cold zones, avoid letting a waterlogged bed freeze solid.
Is pressure-treated wood safe for vegetable gardens?
Modern outdoor-rated pressure-treated wood is commonly used for garden structures, but products and local rules vary. If you prefer to avoid treated wood, choose cedar, redwood, composite boards, or a food-safe liner that does not block drainage.
Why is my elevated bed drying out so fast?
Small soil boxes lose water from the sides and bottom. Add mulch, use drip irrigation, increase the moisture-holding part of the mix, and provide afternoon shade for cool-season crops.
Can I use landscape fabric inside the bed?
Use breathable fabric only over the bottom if soil falls through the drainage gaps. Do not line the sides with plastic or seal the bottom. Roots and excess water need air and an escape path.
Final advice for a strong, productive bed
Build the frame for wet soil, not empty soil. Keep the bed narrow enough to reach, give it more drainage than you think it needs, and use a balanced mix with finished compost. A sturdy 2-by-6-foot bed at about 30 to 36 inches high gives most home gardeners a useful starting point.
Choose crops that match the soil depth and local season. Add mulch, inspect the frame twice a year, and repair small problems before they become structural failures. When built with care, an elevated raised garden bed can make gardening easier, cleaner, and far more comfortable for many growing seasons.
Meta description: Learn how to build an elevated raised garden bed with strong materials, proper drainage, soil mix, crop choices, costs, maintenance tips, and step-by-step instructions.